Showing posts with label dessert. Show all posts

Monday, June 16, 2014

blueberry + vanilla sugar doughnuts


Doughnuts are the best. I cannot find much wrong with sugary, fried, dough.  My husband claims to "not like them" but he's a huge liar because he ate five of these in under ten minutes.. One of his first jobs after arriving in America was working the first shift at Dunkin' Donuts. I think he only lasted a week and developed a supposed aversion to doughnuts/donuts.

Making fried doughnuts can be a bit messy and time consuming, but it is worth it. A fresh, homemade doughnut is such a treat. I recommend not thinking about the future messy kitchen (or cellulite) and just going for it.


blueberry + vanilla sugar doughnuts (makes about two dozen)
-2 cups all purpose flour
-2 teaspoons baking powder
-1/4 teaspoon salt
-1 teaspoon cinnamon
-1/2 cup sugar
-2 tablespoons unsalted butter (at room temperature)
-1 egg
-1 teaspoon vanilla extract
-1 medium, over ripe banana (mashed)
-1/4 cup milk
-1 cup fresh blueberries
-3/4 cup white sugar and 1 teaspoon vanilla extract (for the vanilla sugar coating)
-canola or vegetable oil for frying (3-4 cups is plenty)

1. In a mixing bowl, whisk together the flour, baking powder, salt, and cinnamon. Set aside.
2. Using an electric mixer, cream the butter and sugar until well combined - about a minute. Add in the egg and mix for another minute. Finally, add in the banana, vanilla extract, and milk and mix until well combined.
3. Next add the dry ingredients to the wet and mix until just combined. Scrape down the sides of the bowl to make sure that everything is incorporated. Last, fold in the blueberries. This dough is sticky, so it's helpful to refrigerate it for a few hours before frying.
4. While the dough is in the refrigerator, make the vanilla sugar by mixing a teaspoon of vanilla extract with 3/4 cup white sugar. If you have a vanilla bean, use this instead for a better vanilla flavor. Simply scrape out the inside of the bean and toss with the sugar.
5. After refrigerating the dough for a few hours, flour a work surface. I rolled my dough out on floured parchment paper because I find this helpful for flipping the dough over. Also, the parchment paper helps to cut down on the amount of flour you will have to use.
6. Roll out about a third of the dough at a time and cut with a round cookie or biscuit cutter. If you don't have one of these, use the top of a glass or round lid. The circle I made was about 3" wide. Once you have the circles cut out, cut out the middle with a smaller circle. I used the lid from a bottle of olive oil for the hole of the doughnut.


7. While you are rolling and cutting, have the oil heating over medium-high heat. Use a large pot and allow the oil to heat until small bubbles form along the sides of the pot. You can throw in a small piece of scrap dough to test the heat. The oil will be hot enough when the dough quickly rises to the top. Roll out all the dough (combining the scraps once you have cut the circles) and set the doughnuts aside. If you don't have room to lay out all the cut doughnuts before frying, you can roll, cut, fry, repeat - this is what I did.
8. Before frying the doughnuts, it is helpful to set up each "station." Next to the pot of oil, set a plate lined with paper towels. Next to the plate, put the dish of vanilla sugar (a shallow dish is best for this). Next to that, put a clean plate for the finished product.
9. Begin frying the doughnuts. I cooked three at a time by gently placing them in the hot oil and flipping (with a flat wooden spoon) after about a minute.


10. The doughnuts cook fairly quickly. Each one should take less than two minutes. After removing them from the oil, place on the paper towel lined plate in order to soak up some of the excess oil. While they are still hot, place them on the vanilla sugar plate and coat them with the vanilla sugar. When I finished with all the doughnuts, I fried the doughnut holes. So delicious!


In order to make this recipe go as smoothly as possible, prepare! Once the doughnuts are frying you will need to work fast. 

If blueberries aren't your thing, try substituting strawberries or raspberries or fresh, diced peaches. Yum, peach doughnuts sound pretty amazing - I think that might be my next doughnut project ;).


Monday, April 14, 2014

dark chocolate sea salt caramel cookies


I went almost two weeks with NO sugar in my life (besides fruit). For a sugar-aholic like me, that was really hard. My original idea was to last the entire month of April but I am heading to Florida this week to visit friends and then Ireland the week after that. I like to enjoy my vacations and enjoy = indulge in my mind.

For the past two weeks, I cut out sugar, most dairy, grains, and alcohol. I pretty much only ate fruit, veggies, meat, eggs, beans, olives, and nuts. The plan I kind of followed is called Whole 30. I adjusted it here and there by putting a tiny sprinkle of goat cheese on my salads and eating some beans and dried fruit.

Other than that, I did really well and after two days I stopped craving ALL THE FOODS all day long. 

My favorite thing about the Whole 30 concept is that you just eat real food all the time. I don't know if I lost much weight but I felt amazing. I was waking up every day at 6am, wide awake and ready to go.

After two weeks, I was ready to treat myself so I made chocolate sea salt caramel cookies. I also made myself sick with over eating but it was worth it :). 


The cookies are amazing. I used the same base recipe as my favorite cookies and cream cookies and added in chopped dark chocolate and tiny pieces of Trader Joe's Fleur de Sel caramels, which added a nice, salty touch. If you can't find these caramels, any caramels will work and you can sprinkle the cookies with a tiny bit of sea salt to achieve the salty/sweet flavor.


dark chocolate sea salt caramel cookies (makes about 3 dozen)
-2 1/4 cups all purpose flour
-1 teaspoon baking soda
-1/4 teaspoon salt
-3/4 cup packed brown sugar
-1/2 cup white sugar
-1/2 cup butter (softened or left at room temp for a few hours)
-1 teaspoon vanilla extract
-2 large egg whites
-1/4 cup chopped dark chocolate (I used 1/3 of a bar of 72% cacao dark chocolate but any type of chocolate or chocolate chips will work)

-about 8 caramel candies, chopped into small pieces (I used Trader Joe's Fleur de Sel caramels but any kind will work)


1. Preheat oven to 350 degrees.
2. Combine flour, baking soda, and salt and stir with a whisk.  Set aside.

3. Put sugars and butter in a large bowl and mix with an electric mixer at medium speed until well combined.  Add vanilla extract and egg whites and beat for another minute.  Add flour mixture and beat until just combined.  Lastly, mix in the chocolate.
4. Roll the dough into balls about 1"-1 /2" in diameter and press a small piece of caramel into the center. Put the cookies on baking sheets that have been 
lined with parchment paper (or coated with non-stick spray).  
5. Bake for 10-12 minutes.  Remove from oven and allow the cookies to cool on pans for two minutes and then transfer them to wire racks or a plate in order to cool completely.  


Monday, March 17, 2014

healthy-ish shamrock shake


I love a shamrock shake. Every year I get myself at least one. A few weeks ago, I was craving a milkshake (I have a milkshake problem) and headed out for one. I started towards Jack in the Box (like I said, I have a problem) but then I realized it was shamrock shake season and beelined towards McDonalds.

As I drove home and sipped my favorite seasonal shake, I was so disappointed! It was soupy, so sweet it burned the back of my throat, and they forgot the cherry. Major let down, but maybe I have outgrown these shakes? Probably not. I just think the McDonald's by my house is the worst. I will try again in the future but for now, I made my own version. The McDs version is good but so bad. They are full of chemicals, the opposite of natural in all ways, and not at all good for you.

Despite my disappointment, I love the shamrock shake idea. They are minty and green and so cute for St. Patrick's Day. I looked around on Pinterest for a healthier option and almost all the recipes I found have spinach in them. I get that spinach is an all natural way to make the shake green but personally, I don't want spinach in my milkshake. I am fine with it in a smoothie, but a milkshake should be just a little bit indulgent, don't you think?


I whipped up this version that is healthy-ish. Much healthier than any McD's shake and not full of crazy chemicals and green dye. I used two scoops of vanilla ice cream, a handful of fresh chopped mint leaves, a frozen banana, and unsweetened coconut milk. I topped the shake off with a raspberry, a tiny bit of real (not cool whip) whipped cream, and dark chocolate shavings.


This version is really good. It isn't super green, but it's delicious and has a great minty flavor. If you add more ice cream, it would probably be even better....

Happy St. Patrick's Day!


Wednesday, March 12, 2014

chia seed pudding - three ways


The past few months I have seen chia seed pudding on just about every blog. I was kind of skeptical because, why mess with pudding? And maybe the texture would be gross? But I am making a huge effort to health up my diet (my eating has been out of order since Christmas....actually since Thanksgiving) and decided to try a healthier option to quell my sweet tooth.

I whipped up a basic batch last week and guess what? It's really good! And healthy. And you can add whatever you want as a topping. It makes for a fun breakfast.


After my first attempt, I decided to try it again with a few variations. I tried cinnamon (perfect for breakfast), double chocolate (a perfect dessert when you are trying to not always eat ice cream), and banana (a perfect sweet snack).


Making chia seed pudding is easy. You just mix a few things together and let it sit in the fridge for a few hours to set. You can use any non-dairy milk you like. My favorite is unsweetened coconut milk but unsweetened almond milk would be really good too.


chia seed pudding - three ways

-cinnamon (1/4 cup chia seeds, 1 cup Silk Unsweetened Coconut milk, 1 teaspoon cinnamon)

-double chocolate (1/4 cup chia seeds, 1 1/4 cup Silk Unsweetened Coconut milk, 1 tablespoon cocoa powder, 2 tablespoons honey, chopped dark chocolate - about 1/4 cup)
-banana (1/4 cup chia seeds, 1 cup Silk Unsweetened Coconut milk, 1 tablespoon honey, 1 mashed banana)


Put the ingredients of each in three separate bowls, mix together, cover, and refrigerate for at least four hours before eating. These puddings will last for about a week. The banana version will last just a few days because the banana starts to brown.

I have been eating the "cinnamon" version every morning topped with berries. It is kind of like plain yogurt so you can top it with whatever you might put on plain yogurt.  Also, the chocolate is amazing with a few raspberries on top.


If you're interested in trying this simple recipe, grab some non-dairy milk such as Silk. I have always been pretty grossed out by cow milk but the Silk products taste really good and they're a great way to add more plants to your diet.


Stop by Silk, register, and get a coupon for your next purchase.

This is a sponsored conversation written by me on behalf of Silk. The opinions and text are all mine.


Monday, March 10, 2014

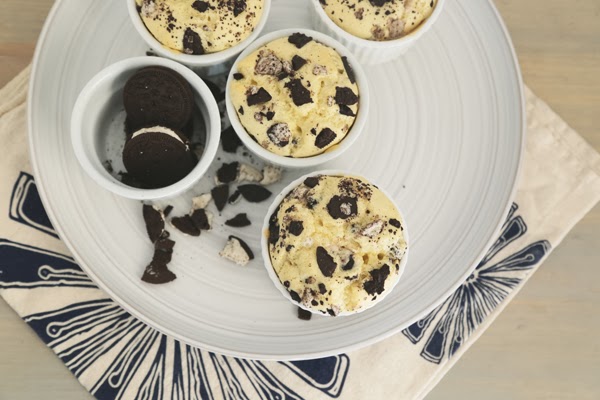
sunday dessert : cookies and cream souffles


I pretty much love cookies and cream anything. These cookies are my absolute favorite so last Sunday I transformed them into super easy, light, and delicious souffles. They were the perfect extra special dessert for a Sunday night spent watching the Oscars.

You can use any "sandwich" cookies in this recipe. My favorite are the Trader Joe's JoJos (their version of Oreos). I think they are so much better than Oreos.  If you haven't tried them, buy some! They're so good. And addicting. 

cookies and cream souffles (makes four)
-5 tablespoons flour
-1/2 teaspoon salt
-1/2 teaspoon baking powder
-2 tablespoons brown sugar
-2 eggs, separated
-3 tablespoons milk
-about 1 teaspoon butter and a little white sugar (for coating the ramekins)
-3 or 4 sandwich cookies, crushed (Oreos or my favorite, Trader Joe's JoJo's)
1. Preheat the oven to 350 degrees.  Prepare two ramekins by coating with a tiny bit of butter {about 1/4 teaspoon per dish} and dusting with a tiny bit of white sugar.

2. In a small bowl, whisk together the flour, salt, baking powder, and brown sugar.  

3. Mix the milk into the dry ingredients and separate the eggs.  Add the yolks to the dry ingredients/milk and put the egg whites in a different bowl.

4. Use an electric mixer to beat the egg whites until soft peaks form.  This should take about 45 seconds to a minute.

5. Gently fold the egg whites into the rest of the ingredients.  Be sure to mix until all is combined but don't over mix. You don't want to lose the volume from the egg whites. Finally, gently fold in about half of the crushed cookies.

6. Pour the batter into the four dishes and top each one with a little of the remaining crushed cookies.

7. Bake for about 20 or 23 minutes...just until the top is golden and puffed up.


Enjoy!  These are SO good.  I know I will be making them again and again.

Thursday, February 13, 2014

banoffee custard pie


Last weekend was Neil's birthday, so I made him a banoffee pie.  

I love banoffee pie. It's a popular dessert in Ireland and traditionally is made from a cookie crust (I used graham crackers, but plain digestives would be used in Ireland), a layer of toffee, a layer of bananas, and a layer of whipped cream. I decided to add a layer of banana custard because....why not? Custard only makes this pie better.   

My banoffee custard pie is buttery, sticky, sweet, creamy, and so delicious. Not one bit of it is healthy or slimmed down in any manner but whatevs, sometimes you just need a full on dessert. This pie should serve about ten people. 

We had it in our refrigerator for three days and every time I went into the kitchen, I would take a bite. It was bad. But also so good.


This dessert has several steps but each one is really easy. I suggest making the bottom three layers (crust, toffee, and custard) several hours ahead of time and them finishing off with the banana and whipped cream topping an hour or so before serving.

banoffee custard pie (serves about 10)

for the crust-
2/3 a box of graham crackers (I used two out of the three packs in the box)
6 tablespoons of melted butter

for the toffee
one can of sweetened condensed milk
2 tablespoons brown sugar
4 tablespoons butter

for the custard
1 3/4 cup milk (fat free or full fat, either works)
2 tablespoons cornstarch
1/4 cup white sugar
1/2 teaspoon vanilla extract
a generous sprinkle of cinnamon
1 small banana
pinch of salt

topping
one large banana (or two small - enough slices to cover the top of the pie)
one cup of heavy whipping cream
dark chocolate shavings (optional)

1. To make the crust, put the graham crackers in a food processor and process until they are crumbs.  This should take less than 30 seconds. Once they turn to crumbs, pour in the melted butter.  The crust will begin to come together after a few seconds.  
2. Dump the graham cracker/butter mixture out into a nine inch springform pan. Use clean hands or a spatula to spread the mixture along the bottom and somewhat up the sides of the pan.
3. Set the crust in the freezer for about ten minutes while you make the toffee.

4. For the toffee, melt the butter and brown sugar in a saucepan.  Stir in the can of sweetened condensed milk and whisk all together.  
5. Bring to a boil and stir constantly.  Boil and stir for about 3 minutes.  When the color of the toffee has darkened to a light brown, it's finished.
6. Remove the crust from the freezer and pour the toffee into the pan.  Set aside for about ten minutes so that it can cool slightly.

7. While the toffee is cooling, make the custard.  Put the milk, sugar, and cornstarch into a small bowl or liquid measuring cup and whisk.  Pour this into a blender with a small banana.  Blend until smooth and pour the mixture into a small saucepan.  Do not turn on the heat yet.  First let the blended mixture settle for about ten minutes, as it will have a layer of foam on top from being blended.
8. After the foam has settled, turn the heat to medium-high and stir almost constantly.  Bring the custard to a boil and then begin to constantly stir, scraping the bottom and sides of the pan.  Allow this to boil for about a minute, remove from the heat, and stir in the vanilla and cinnamon.
9. Spread the custard out over the toffee, allow the pie to cool at room temp for about 30 minutes and then put in the refrigerator for several hours (at least three).

10. A little bit before serving, make the whipped cream.  Whip the cold whipping cream until stiff peaks form.
11. Top the pie with slices of banana, then spread a thick layer of the whipped cream over the bananas.
12. Finish off with dark chocolate shavings and enjoy!  It's totally worth all the steps. 


Monday, December 30, 2013

caramelized pear bread pudding

One thing I really love about the holidays is cooking (and eating) special recipes that I don't often make throughout the year. Since we were home for the Christmas week, I kind of over did it on the food thing.  And by kind of, I mean totally.  I totally over did it.  So fat right now but so worth it.

My husband loves bread pudding so I made one on Sunday.  It was four days after Christmas but I am in full "eat like it's a holiday" mode until January 6th.  I just can't stop.  

Anyways...enough of my bad eating habits....bread pudding is such a simple dessert. Anyone can make it.  I made a small-ish recipe but it can easily be double or tripled.    The amounts below should be enough for at least six people.

caramelized pear bread pudding (serves about six)
-two thirds a loaf of challah bread
-3 eggs 
-1 cup milk
-2 teaspoons vanilla extract
-5 small-medium pears - diced
-3 tablespoons butter plus a little extra for greasing the baking dish.
-3 tablespoons honey

1. Preheat the oven to 375 degrees.
2. Use a little butter to grease a square baking dish (a 9"x9" size is good) and set aside.
3. In a skillet, melt the three tablespoons butter.  Slowly cook the pear pieces in the butter until nicely browned.  Stir in the honey and remove the pan from the heat.
4. Whisk together the eggs, milk, and vanilla extract.
5. Layer a few slices of bread in the bottom of the baking dish, top with half the pears, then more bread.  Pour the milk and egg mixture over the bread and bake for 25 minutes.  After 25 minutes, pour what remains of the pears, butter, and honey over the top of the bread pudding and bake for another 15 minutes.  You will know it is done when it is golden brown and has puffed up.  Serve as is or with ice cream or whipped cream.  Or...both :).

Monday, October 07, 2013

mini monkey bread


To me, monkey bread is a total 1980s dessert. I think this is because the first time I had it was in the 80s. I was maybe in kindergarten?  I don't remember but for some reason, I was sent home with a little book of recipes and a recipe for monkey bread was in the book.

This recipe is so sweet and buttery and not a health food at all. It's also incredibly easy.  If I made it when I was five....you can easily make it now.  It's a hard one to screw up ;).

I used a mini bundt pan because I just thought it was so much cuter than an average bundt pan, but either will work.  You can even make this in a square baking dish or muffin tin.

mini monkey bread
-one package of store bought biscuits (if you are using a standard sized bundt pan, you can make this with two packages of store bought biscuits)
-3/4 cup sugar
-a few teaspoons of cinnamon (use more or less depending on how cinnamon-ey you want the bread)
-a stick of butter, melted

1. Heat your oven to 350 degrees.
2. Pull the biscuits apart and cut each in quarters.  I used whole wheat biscuits but it doesn't matter. Whatever kind you use, they will just end up tasting like delicious pieces of butter, cinnamon, and sugar.
3. Mix the cinnamon and sugar in a large bowl and toss in the biscuit pieces until well coated.  Press the sugar coated biscuit pieces in the bundt or mini bundt pan.  If you use the mini one, only put in about three pieces.  I over stuffed a few of them and there wasn't enough room for the butter to coat each piece.  

4. Pour melted butter over the top and bake for about 30 minutes.  If you do minis, 30 minutes is enough time.  A whole cake will likely take about ten minutes longer.  You will know this recipe is done when the biscuit pieces have puffed up and are golden brown.  This dessert is best served warm.


You have been warned - these little guys are addicting.  I ate at least five of them.  What can I say?  I'm a sucker for cinnamon-sugar :).

Tuesday, August 27, 2013

mini blueberry-peach pies


Saturday it all hit me - my jet lag from our Rome/Ireland trip that followed by a busy {and let's get real, at times alcohol soaked} four days in Vegas.  Mix in a stupid cold that stuck around for two weeks and I was exhausted on Saturday.  I slept half the day, woke tired and then went back to bed at 8pm.   The one thing I managed to do all day was make these mini pies and eat.

I also went to the store because we were out of garbage bags.  Although we could have easily gotten by for one day with old grocery bags, I made the trip because Yogurtland is located next to the grocery store. After two mini pies I really needed a massive serving of froyo and candy.  It was just one of those days :).

These pies are the perfect "look like you slaved but they're ridiculously simple" dessert.  Make them and wow everyone with your baking skills.  


mini blueberry-peach pies {makes six mini pies - double for more}

filling
-a cup of blueberries
-two large peaches - chopped
-1/2 teaspoon cinnamon

crust
-1/4 cup sugar
-1/3 cup vegetable oil
-1 teaspoon baking powder
-1 teaspoon vanilla extract
-1/4 teaspoon salt
-1 egg
-1 cup and one tablespoon all purpose flour


1. Preheat the oven to 400 degrees.
2. In a bowl, toss together the blueberries and peaches and cinnamon.  Set aside. 
3. In a second bowl, put all the ingredients for the crust and mix together with a wooden spoon until well combined.
4. Fill six ramekins {or small mugs that are oven safe if you don't have ramekins} with the fruit and top each ramekin with the dough.  I started with a small handful of dough, flattened it into a disc shape, and spread it over the top of the fruit.  Once the dough is pushed to the edge of each ramekin, use a sharp knife and mark the top of each pie with an X.
5. Put the ramekins on a baking sheet {they will spill over!} and bake for about 20 minutes or until the fruit is bubbly and the crust is golden.


I ate mine with a small scoop of vanilla ice cream.  It was perfection.


Wednesday, July 31, 2013

strawberry sweet cream ice cream sandwiches


I love ice cream and I love cookies, so I put these two loves together and make ridiculously good ice cream sandwiches.

I "ruined" one plate by trying to build these when the ice cream was super soft.  Not a good idea.  I thought it would be easier since I could scoop and spread without utilizing any upper body strength but my laziness got the best of me.  The ice cream oozed out of the cookie sandwich and filled the plate with a puddle of ice cream and soft cookies.  

In the end, it was a delicious mistake because I froze it and then had a plate of cookie/ice cream goodness.  Sometimes laziness pays off.

By the time I got to the second plate, I had learned my lesson and used firm ice cream. Tip - build these suckers fast, ice cream melts!


strawberry sweet cream ice cream sandwiches {makes about 18}

for the cookies
-1/2 cup unsalted butter - softened 
-1/2 cup sugar
-1 egg and 1 egg white
-1/4 cup milk {I used non fat but whatever you have is fine}
-1/4 cup International Delight Sweet Cream {if you don't have this on hand, substitute with milk or cream}
-1/2 teaspoon vanilla extract
-2 1/2 cups all purpose flour
-1 1/2 teaspoons baking powder
-1/4 teaspoon salt

for the ice cream
-a pint of vanilla ice cream {you might need a bit more depending on how many cookies you have and how thick you want the filling}
-1 1/2 cup chopped strawberries
-the juice from one half a lemon
-2 tablespoons International Delight Sweet Cream {again, you can skip this and add in honey if you want the strawberries to be super sweet}


1. In a bowl, whisk together the flour, baking powder, and salt and set aside.
2. Use an electric mixer to cream together the butter and sugar.  Let mix for about a minute and add in the eggs and vanilla extract.  Continue to mix until well combined - about another minute.
3. While the mixer is on low, add in 1/3 of the dry ingredients, then the milk, then 1/3 more of the dry ingredients, then the Sweet Cream, then the remaining dry ingredients.  Mix until just combined.
4. This dough is sticky, so lightly flour parchment or waxed paper and roll the dough out onto it.  Using floured hands, make the dough into a log shape, wrap up in the paper and refrigerate for a few hours, until firm.
5. Once the dough is firm, slice in 1/4" thick pieces and lay out on a cookie sheet lined with parchment paper.  Bake in a 350 degree oven for about 10 minutes.  Longer if you want the cookies crisp, but I like mine soft.  Allow the cookies to cool for a few minutes on the cookie sheets then transfer to a plate to cool completely.

6. Once the cools are completely cooled, make the strawberry syrup.  Just chop the strawberries into tiny pieces and put in a small saucepan set over low heat.  Mix in the lemon juice and let the berries cook for about 10 minutes.  They will reduce and thicken.  Remove the mixture from the heat and allow to cool completely.  Once cooled, whisk in the Sweet Cream.
7. In a large bowl, combine the vanilla ice cream and strawberry mixture.  You could just skip all of this and use strawberry ice cream but the flavor from the fresh strawberries is pretty amazing....far better than any standard store bought strawberry ice cream.
8. Pop the bowl of ice cream into the freezer so it hardens.  This is where I messed up and began building my sandwiches that became a soupy delicious ice cream mess.

9. Once the ice cream is firm but still scoop-able, build your sandwiches and immediately place them in airtight containers {lining with parchment paper helps with stacking them on top of each other} in the freezer.


I want to make these again, except as a sort of cake.  My idea is to bake to halves of cookie crust in large sheets and then layer it all in a rectangle pan and slice into sandwich pieces.  I think this will make the sandwich building part a little easier because everything will be able to freeze together.

Also, different kinds of fruit would be amazing - peaches or plums sound pretty good to me :).


Love ice cream + coffee? This summer, International Delight is bringing your favorite Cold Stone Creamery ice cream flavors to coffee and they're celebrating by giving away five $400 grand prizes to throw this summer’s ultimate Ice Cream Social!  To enter, visit the ID + Ice Cream Pinterest board and pin your favorite image using the #IScream4ID hashtag. Good luck!


This is a sponsored conversation written by me on behalf of International Delight. The opinions and text are all mine.

Tuesday, June 25, 2013

cookies and cream cookies


I love a lot of what I make {if I don't love it, I don't post about it :)} but these cookies were the best things EVER.

They are my new go-to cookie.  Everyone needs a go-to cookie.  I used my favorite chocolate chip cookie recipe that I found it a few years ago in Cooking Light magazine and used crushed oreos instead of chocolate chips.

Amazing.


I love Oreos.  They might be little processed bits of sugar and who knows what else, but they are justsofreakinggood.  I also really love the Trader Joe's version JoJo's.  The Trader Joe's version has a really nice vanilla flavor that it just a little different and so tasty.  They also make a mint version around the holidays....which means, come December,  mint cookies and cream cookies will be my new favorite holiday cookie.

If you love Oreos or JoJo's or any version you must make this recipe.  I ate at least ten cookies in one day.  I could.not.stop.

cookies and cream cookies {makes about 3 and a half dozen}
-2 1/4 cups all purpose flour
-1 teaspoon baking soda
-1/4 teaspoon salt
-1 cup packed brown sugar
-3/4 cup white sugar
-1/2 cup butter (softened or left at room temp for a few hours)
-1 teaspoon vanilla extract
-2 large egg whites
-4-6 crushed oreo cookies {or a similar cookie}


1. Preheat oven to 350 degrees.
2. Combine flour, baking soda, and salt and stir with a whisk.  Set aside.
3. Put sugars and butter in a large bowl and mix with an electric mixer at medium speed until well combined.  Add vanilla extract and egg whites and beat for another minute.  Add flour mixture and beat until just combined.  Lastly, mix in the oreos.
4. This dough will be slightly crumbly, so roll into balls about 1"-1 /2" in diameter and press onto baking sheets that have been coated with cooking spray {or parchment paper}.  

5. Bake for 10-12 minutes.  Remove from oven and allow the cookies to cool on pans for two minutes and then transfer them to wire racks or a plate in order to cool completely.  


Tuesday, June 11, 2013

sunday dessert - jam filled mini chocolate cupcakes


Confession - I made these little cupcakes on Friday but was still consuming them on Sunday....so it counts as my Sunday dessert.

I am actually a little surprised these lasted until Sunday.  They are mini - so you know how it goes with any mini dessert, you think you can eat ten in one sitting.  Or is that just me?  Mini candy bars are my kryptonite.


I found out Friday morning {via instagram} that it was national doughnut day and immediately had a doughnut craving.  As I drove around, running my usual Friday errands, I was hoping to see a doughnut shop....but I never saw one.  A drive thru Tim Horton's or Dunkin' Donuts would have been ideal but this isn't the Midwest.  Damn you healthy Southern California!

I went home with an unsatisfied sweet tooth craving and decided to make my healthy-ish chocolate cake recipe into mini cupcakes and fill them with this homemade jam.  The homemade jam filling was a last minute decision and I am so glad I did it.

Filling a cupcake or muffin with something sweet makes it instantly more amazing than its unfilled friends.  SO good!  Try them, they aren't too unhealthy and it will be a great way to use up those four pounds of strawberries Trader Joe's tricked you into buying.


jam filled mini chocolate cupcakes
-1/3 cup unsweetened cocoa powder
-1 1/4 cups all purpose flour
-2/3 cups sugar
-1/2 teaspoon salt
-1 teaspoon baking powder
-2 tablespoons canola oil
-1 cup warm water
-homemade {or stor bought} jam - about a cup of it

1. Heat the oven to 350 degrees and grease a mini muffin {or regular size muffin pan} with nonstick cooking spray.
2. In a mixing bowl, whisk together the dry ingredients {cocoa powder, flour, sugar, salt, and baking powder}.  Add the oil and water to the mixing bowl and stir all together.  I like to a use a wooden spoon for this.
3. Fill each muffin cup a little less than half way.  Next, put about 1/2 teaspoon of jam on each muffin, then fill the rest of the cup with more batter.
4. Bake these cupcakes for about 15 to 20 minutes.  Let them cool for a few minutes in the pan and carefully remove them and set on a plate.  
5. Dust with a little powdered sugar and eat! These are best consumed within a few days.  

If you use regular a regular size muffin pan, this recipe will make about 12 large cupcakes.  Since these cupcakes have a low fat content, I find that paper liners stick too much. Instead, I opt for nonstick spray.


Designed by Jackie Ayr