Showing posts with label cookies. Show all posts

Monday, April 14, 2014

dark chocolate sea salt caramel cookies


I went almost two weeks with NO sugar in my life (besides fruit). For a sugar-aholic like me, that was really hard. My original idea was to last the entire month of April but I am heading to Florida this week to visit friends and then Ireland the week after that. I like to enjoy my vacations and enjoy = indulge in my mind.

For the past two weeks, I cut out sugar, most dairy, grains, and alcohol. I pretty much only ate fruit, veggies, meat, eggs, beans, olives, and nuts. The plan I kind of followed is called Whole 30. I adjusted it here and there by putting a tiny sprinkle of goat cheese on my salads and eating some beans and dried fruit.

Other than that, I did really well and after two days I stopped craving ALL THE FOODS all day long. 

My favorite thing about the Whole 30 concept is that you just eat real food all the time. I don't know if I lost much weight but I felt amazing. I was waking up every day at 6am, wide awake and ready to go.

After two weeks, I was ready to treat myself so I made chocolate sea salt caramel cookies. I also made myself sick with over eating but it was worth it :). 


The cookies are amazing. I used the same base recipe as my favorite cookies and cream cookies and added in chopped dark chocolate and tiny pieces of Trader Joe's Fleur de Sel caramels, which added a nice, salty touch. If you can't find these caramels, any caramels will work and you can sprinkle the cookies with a tiny bit of sea salt to achieve the salty/sweet flavor.


dark chocolate sea salt caramel cookies (makes about 3 dozen)
-2 1/4 cups all purpose flour
-1 teaspoon baking soda
-1/4 teaspoon salt
-3/4 cup packed brown sugar
-1/2 cup white sugar
-1/2 cup butter (softened or left at room temp for a few hours)
-1 teaspoon vanilla extract
-2 large egg whites
-1/4 cup chopped dark chocolate (I used 1/3 of a bar of 72% cacao dark chocolate but any type of chocolate or chocolate chips will work)

-about 8 caramel candies, chopped into small pieces (I used Trader Joe's Fleur de Sel caramels but any kind will work)


1. Preheat oven to 350 degrees.
2. Combine flour, baking soda, and salt and stir with a whisk.  Set aside.

3. Put sugars and butter in a large bowl and mix with an electric mixer at medium speed until well combined.  Add vanilla extract and egg whites and beat for another minute.  Add flour mixture and beat until just combined.  Lastly, mix in the chocolate.
4. Roll the dough into balls about 1"-1 /2" in diameter and press a small piece of caramel into the center. Put the cookies on baking sheets that have been 
lined with parchment paper (or coated with non-stick spray).  
5. Bake for 10-12 minutes.  Remove from oven and allow the cookies to cool on pans for two minutes and then transfer them to wire racks or a plate in order to cool completely.  


Monday, March 10, 2014

sunday dessert : cookies and cream souffles


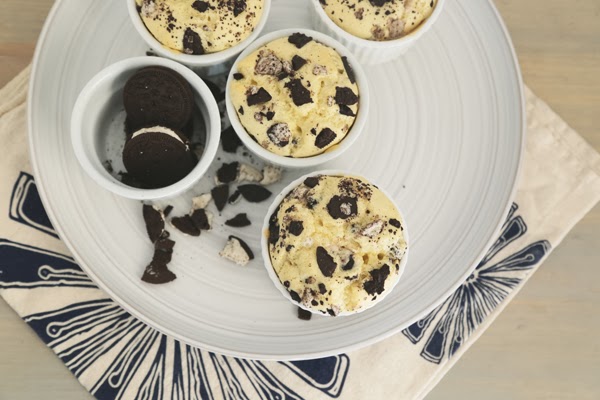
I pretty much love cookies and cream anything. These cookies are my absolute favorite so last Sunday I transformed them into super easy, light, and delicious souffles. They were the perfect extra special dessert for a Sunday night spent watching the Oscars.

You can use any "sandwich" cookies in this recipe. My favorite are the Trader Joe's JoJos (their version of Oreos). I think they are so much better than Oreos.  If you haven't tried them, buy some! They're so good. And addicting. 

cookies and cream souffles (makes four)
-5 tablespoons flour
-1/2 teaspoon salt
-1/2 teaspoon baking powder
-2 tablespoons brown sugar
-2 eggs, separated
-3 tablespoons milk
-about 1 teaspoon butter and a little white sugar (for coating the ramekins)
-3 or 4 sandwich cookies, crushed (Oreos or my favorite, Trader Joe's JoJo's)
1. Preheat the oven to 350 degrees.  Prepare two ramekins by coating with a tiny bit of butter {about 1/4 teaspoon per dish} and dusting with a tiny bit of white sugar.

2. In a small bowl, whisk together the flour, salt, baking powder, and brown sugar.  

3. Mix the milk into the dry ingredients and separate the eggs.  Add the yolks to the dry ingredients/milk and put the egg whites in a different bowl.

4. Use an electric mixer to beat the egg whites until soft peaks form.  This should take about 45 seconds to a minute.

5. Gently fold the egg whites into the rest of the ingredients.  Be sure to mix until all is combined but don't over mix. You don't want to lose the volume from the egg whites. Finally, gently fold in about half of the crushed cookies.

6. Pour the batter into the four dishes and top each one with a little of the remaining crushed cookies.

7. Bake for about 20 or 23 minutes...just until the top is golden and puffed up.


Enjoy!  These are SO good.  I know I will be making them again and again.

Wednesday, July 31, 2013

strawberry sweet cream ice cream sandwiches


I love ice cream and I love cookies, so I put these two loves together and make ridiculously good ice cream sandwiches.

I "ruined" one plate by trying to build these when the ice cream was super soft.  Not a good idea.  I thought it would be easier since I could scoop and spread without utilizing any upper body strength but my laziness got the best of me.  The ice cream oozed out of the cookie sandwich and filled the plate with a puddle of ice cream and soft cookies.  

In the end, it was a delicious mistake because I froze it and then had a plate of cookie/ice cream goodness.  Sometimes laziness pays off.

By the time I got to the second plate, I had learned my lesson and used firm ice cream. Tip - build these suckers fast, ice cream melts!


strawberry sweet cream ice cream sandwiches {makes about 18}

for the cookies
-1/2 cup unsalted butter - softened 
-1/2 cup sugar
-1 egg and 1 egg white
-1/4 cup milk {I used non fat but whatever you have is fine}
-1/4 cup International Delight Sweet Cream {if you don't have this on hand, substitute with milk or cream}
-1/2 teaspoon vanilla extract
-2 1/2 cups all purpose flour
-1 1/2 teaspoons baking powder
-1/4 teaspoon salt

for the ice cream
-a pint of vanilla ice cream {you might need a bit more depending on how many cookies you have and how thick you want the filling}
-1 1/2 cup chopped strawberries
-the juice from one half a lemon
-2 tablespoons International Delight Sweet Cream {again, you can skip this and add in honey if you want the strawberries to be super sweet}


1. In a bowl, whisk together the flour, baking powder, and salt and set aside.
2. Use an electric mixer to cream together the butter and sugar.  Let mix for about a minute and add in the eggs and vanilla extract.  Continue to mix until well combined - about another minute.
3. While the mixer is on low, add in 1/3 of the dry ingredients, then the milk, then 1/3 more of the dry ingredients, then the Sweet Cream, then the remaining dry ingredients.  Mix until just combined.
4. This dough is sticky, so lightly flour parchment or waxed paper and roll the dough out onto it.  Using floured hands, make the dough into a log shape, wrap up in the paper and refrigerate for a few hours, until firm.
5. Once the dough is firm, slice in 1/4" thick pieces and lay out on a cookie sheet lined with parchment paper.  Bake in a 350 degree oven for about 10 minutes.  Longer if you want the cookies crisp, but I like mine soft.  Allow the cookies to cool for a few minutes on the cookie sheets then transfer to a plate to cool completely.

6. Once the cools are completely cooled, make the strawberry syrup.  Just chop the strawberries into tiny pieces and put in a small saucepan set over low heat.  Mix in the lemon juice and let the berries cook for about 10 minutes.  They will reduce and thicken.  Remove the mixture from the heat and allow to cool completely.  Once cooled, whisk in the Sweet Cream.
7. In a large bowl, combine the vanilla ice cream and strawberry mixture.  You could just skip all of this and use strawberry ice cream but the flavor from the fresh strawberries is pretty amazing....far better than any standard store bought strawberry ice cream.
8. Pop the bowl of ice cream into the freezer so it hardens.  This is where I messed up and began building my sandwiches that became a soupy delicious ice cream mess.

9. Once the ice cream is firm but still scoop-able, build your sandwiches and immediately place them in airtight containers {lining with parchment paper helps with stacking them on top of each other} in the freezer.


I want to make these again, except as a sort of cake.  My idea is to bake to halves of cookie crust in large sheets and then layer it all in a rectangle pan and slice into sandwich pieces.  I think this will make the sandwich building part a little easier because everything will be able to freeze together.

Also, different kinds of fruit would be amazing - peaches or plums sound pretty good to me :).


Love ice cream + coffee? This summer, International Delight is bringing your favorite Cold Stone Creamery ice cream flavors to coffee and they're celebrating by giving away five $400 grand prizes to throw this summer’s ultimate Ice Cream Social!  To enter, visit the ID + Ice Cream Pinterest board and pin your favorite image using the #IScream4ID hashtag. Good luck!


This is a sponsored conversation written by me on behalf of International Delight. The opinions and text are all mine.

Thursday, July 11, 2013

sunday dessert - banana cookies and cream ice cream


A few weeks ago, I bought the Jeni's Splendid Ice Cream at Home cookbook and I love it!  I have owned an ice cream maker for over six years and love experimenting with different recipes but none I have tried are as amazing as Jeni's.

When writing her cookbook, Jeni really wanted the at home cook, with the basic ice cream maker, to be able to make good ice cream.  The recipes she developed are perfect for any of us with a simple ice cream maker {like this Cuisnart one that I own} and her flavor combinations are crazy!  So adventurous and unique.  I cannot wait to try them all.

The other day, I used Jeni's base recipe and added a little vanilla extract and pureed banana.  After freezing the mixture in my ice cream maker, I layered it with crushed Trader Joe's JoJo cookies {they're like Oreos}.  You can use any cookies you love or even chocolate chips, candy, etc.  I think M&M's would be amazing in this ice cream.


Vanilla ice cream + banana + crushed cookies or candy is one of my favorite desserts.  This recipe has such a nice banana/vanilla flavor and the crunch from the cookies is perfect.

banana cookies and cream ice cream {base recipe from Jeni's Splendid Ice Cream at Home}
-2 cups whole milk
-1 tablespoon + 1 teaspoon cornstarch
-3 tablespoons softened plain cream cheese
-1/8 teaspoon salt
-1 1/4 cups heavy cream
-2/3 cups sugar
-2 tablespoons light corn syrup {the kind with NO high fructose}
-1 teaspoon vanilla extract
-1 banana, pureed
-1 cup crushed cookies

1. In a small bowl or cup, mix 2 tablespoons of the milk with the cornstarch to create a slurry.  Set aside.
2. Put the cream cheese in a medium bowl {one that will be large enough to hold all the milk, cream, and sugar} and whisk with the salt.  Set aside.
3. Combine the remaining milk, cream, sugar, corn syrup, and vanilla extract in a heavy bottom saucepan and bring to a boil.  Allow to boil for about four minutes and remove from the heat.  You will need to watch the mixture as it is boiling and stir occasionally so that it doesn't boil over and the milk doesn't stick to the sides and bottom of the pan.
4. Add the milk/cornstarch slurry to the pan and return to the heat.  Set over medium-high heat and stir constantly with a wooden spoon or silicone {high heat} spatula.  Make sure you are scraping the sides and bottom of the pan as you are stirring.  After about a minute, the mixture will thicken and you can remove it from the heat.
5. Pour a small amount of the hot mixture over the cream cheese and whisk until smooth.  Gradually pour in the rest of the hot liquid while whisking all together.  Last, whisk in the pureed banana.
6. Now you will need to cool down the mixture before putting it into the ice cream maker.  Jeni's book suggests pouring the liquid into a Ziploc freezer bag and submerging in a bowl of ice water.  I didn't have any freezer bags {I don't buy or use a lot of plastic bags} so instead, I filled a big bowl with ice and cold water and set the bowl with the hot liquid in it for about 30-40 minutes.
7. Finally pour the cooled down mixture into the ice cream maker and churn for about 25 minutes.  You will know it is done when it begins to pull away from the sides.
8. In a large airtight container, layer ice cream, crushed cookies, ice cream, crushed cookies, and so on until all is gone.  Freeze for a few hours before serving.

When you first remove this ice cream from the freezer, it will be very hard and impossible to scoop.  I let it sit on the counter for about ten minutes before scooping.


I have made several variations of this ice cream using Jeni's base and each time it tastes a little better.  The recipe is simple but might take a little practice....so have fun experimenting.  It's summer and the best time of year for ice cream :).


Tuesday, June 25, 2013

cookies and cream cookies


I love a lot of what I make {if I don't love it, I don't post about it :)} but these cookies were the best things EVER.

They are my new go-to cookie.  Everyone needs a go-to cookie.  I used my favorite chocolate chip cookie recipe that I found it a few years ago in Cooking Light magazine and used crushed oreos instead of chocolate chips.

Amazing.


I love Oreos.  They might be little processed bits of sugar and who knows what else, but they are justsofreakinggood.  I also really love the Trader Joe's version JoJo's.  The Trader Joe's version has a really nice vanilla flavor that it just a little different and so tasty.  They also make a mint version around the holidays....which means, come December,  mint cookies and cream cookies will be my new favorite holiday cookie.

If you love Oreos or JoJo's or any version you must make this recipe.  I ate at least ten cookies in one day.  I could.not.stop.

cookies and cream cookies {makes about 3 and a half dozen}
-2 1/4 cups all purpose flour
-1 teaspoon baking soda
-1/4 teaspoon salt
-1 cup packed brown sugar
-3/4 cup white sugar
-1/2 cup butter (softened or left at room temp for a few hours)
-1 teaspoon vanilla extract
-2 large egg whites
-4-6 crushed oreo cookies {or a similar cookie}


1. Preheat oven to 350 degrees.
2. Combine flour, baking soda, and salt and stir with a whisk.  Set aside.
3. Put sugars and butter in a large bowl and mix with an electric mixer at medium speed until well combined.  Add vanilla extract and egg whites and beat for another minute.  Add flour mixture and beat until just combined.  Lastly, mix in the oreos.
4. This dough will be slightly crumbly, so roll into balls about 1"-1 /2" in diameter and press onto baking sheets that have been coated with cooking spray {or parchment paper}.  

5. Bake for 10-12 minutes.  Remove from oven and allow the cookies to cool on pans for two minutes and then transfer them to wire racks or a plate in order to cool completely.  


Monday, May 06, 2013

sunday dessert - chocolate chip cookie souffles


Just about every Sunday I make some sort of dessert.  I am going to try to share my Sunday desserts with you guys whenever they happen.  Some weeks I just don't make a dessert and some weeks I repeat recipes and some weeks I don't feel like taking pictures :).   Hopefully I will get around to at least two Sunday dessert posts every month.

You might not know this about me but I love sweets.  And by love I mean obsessed with them and have no self control.  One way I have found to control my sweet tooth is to have limited portions at my disposal.   I would love to make a big ol' chocolate cake but there are only two of us and my husband isn't a big fan of cake {I know!} so if I ended up making a cake, I would be eating it for days.

Through my plan to create desserts with limited portions, I have discovered a love of souffles.  They are easy, you can make just one or two at a time, and they seem a lot more indulgent than they actually are.

This chocolate chip cookie souffle I created is SO good.  I have made these several times this past month and yesterday, I finally perfected the recipe.  These souffles are perfect when you are craving a cookie but you don't want several dozen sitting in your kitchen, tempting you all week long....


chocolate chip cookie souffles {serves two}
-2 1/2 tablespoons flour {I use whole wheat, but all purpose works too}
-1/4 teaspoon salt
-1/4 teaspoon baking powder
-1 tablespoon brown sugar
-1 egg, separated
-1 1/2 tablespoon milk
-a tiny bit of butter or butter spread {I like to use earth balance} and white sugar to coat the ramekins
-about 1 tablespoon chocolate chips

1. Preheat the oven to 350 degrees.  Prepare two ramekins by coating with a tiny bit of butter or butter spread {about 1/4 teaspoon per dish} and dusting with a tiny bit of white sugar.
2. In a small bowl, whisk together the flour, salt, baking powder, and brown sugar.  
3. Mix the milk into the dry ingredients and separate the egg.  Add the yolk to the dry ingredients/milk and put the white in a different bowl.
4. Use an electric mixer to beat the egg white until soft peaks form.  This should take about 45 seconds to a minute.
5. Gently fold the egg whites into the rest of the ingredients.  Be sure to mix until all is combined but don't overmix to the point that the volume from the egg whites is lost.
6. Pour the batter into the two dishes and top each one with a few chocolate chips.
7. Bake for about 20 or 23 minutes...just until the top is golden and puffed up.


These souffles are amazing with a small scoop of vanilla ice cream or a dollop of whipped cream....enjoy!


Wednesday, March 06, 2013

nutella chocolate chip cookies


Yesterday my niece helped me make nutella chocolate chip cookies.  She's three, so she  spent most of her time licking out the nutella coated measuring cup.   It was a big help as it prevented me from standing over the sink, licking up all that nutella.


The cookies we made are amazing.  Like seriously amazing.  I cannot stop eating them.   My family left this morning so I have two dozen cookies left to eat.....and no help.  It is kind of dangerous and I feel a little sick from all the sugar.

These cookies are rich and should probably be eaten with a glass of water or milk, if you're a milk drinker.  I am not a milk drinker.  Never have been.  When I was a kid and wouldn't eat my dinner my mom would sometimes make me drink a glass of milk in order to get some nutrients.  This happened often as I rarely ate my dinner.  I would sit for hours refusing to eat until I was threatened with milk or some other punishment and then I would shove down bites of cold fish or meatloaf or whatever else was being forced upon me that night.  The torture!  

Sorry, where was I?  Oh yeah, nutella cookies - make them.  Use them to bribe your kids to eat their dinner.  Eat them all yourself and feel sick.  Whatever, just make them.  You won't regret it.


Nutella Chocolate Chip Cookies {makes about three dozen}
-1 1/2 cups all purpose flour
-1 teaspoon baking soda
-1/4 teaspoon kosher salt
-1/2 cup white sugar
-1/2 cup packed brown sugar
-1/2 cup butter {at room temperature}
-1/2 cup nutella
-1 teaspoon whipped cream vodka or some other flavored vodka or vanilla extract
-1 egg
-1/4 cup dark chocolate chips

1. Pre-heat the oven to 350 degrees and grease two cookie sheets or line them with parchment paper.
2. Beat the room temperature butter with an electric mixer until fluffy, about two minutes.  Add the sugars and continue to mix until well combined, about another three minutes.
3. Add in the nutella, egg, and vodka or vanilla extract and mix for another minute.
4. In a separate bowl, whisk together the flour, baking soda, and salt.  Add the dry ingredients to the mixer and mix on low until just combined.   
5. Fold in the chocolate chips and put spoonfuls onto the cookie sheets.  Bake for eight to ten minutes, remove from the oven and let sit on the cookie sheets for about five minutes, then move to a plate or wire rack to cool.   


The cookies might seem under baked when you remove them from the oven, but they will finish off while sitting on the hot cookie sheets.  The end result is a perfectly chewy cookie.  Resist the urge to leave them in the oven for any longer than ten minutes or else you won't end up with a chewy cookie.


Enjoy!


Monday, February 04, 2013

heart shaped snickerdoodles


Snickerdoodles are my husband's favorite cookie.  He always asks me to make them and I really don't mind because, well, buttery + cinnamon sugary = SO frickin good.  What is it about cinnamon and sugar that is so perfect?  It reminds me of my childhood and lots of loaves of my favorite Pepperidge Farm cinnamon swirl bread.  

For this batch of snickerdoodles, I decided to switch it up and make them heart shaped.  Snickdoodle dough is a lot stickier than the average sugar cookie dough, so you will need to heavily flour your work surface or roll the dough out between two sheets of parchment paper.

I like to use a mix of flour and mostly powdered sugar when rolling out dough - the powdered sugar prevents sticking but it won't dry out the dough as much as flour.


Snickerdoodle Cookies {recipe from the Food Network Favorites cookbook}
-2 3/4 cups all-purpose flour
-1 teaspoon baking soda
-1/2 teaspoon salt
-1/2 cup shortening
-1/2 cup unsalted butter, softened
-1 1/2 cups sugar {plus 3 tablespoons for dusting the cookies}
-2 large eggs
-1/2 teaspoon ground cinnamon {I like to add a little cinnamon to the dough} plus 1 tablespoon for dusting
-extra flour and some powdered sugar for the work surface {less than a cup of each}

1. Heat the oven to 350 degrees and line two baking sheets with parchment paper.
2. In a large bowl, whisk together the flour, baking soda, and salt.
3. Using an electric hand or stand mixer, beat together the shortening and butter until well combined.  Add the 1 1/2 cup of sugar and continue to beat until light and fluffy, this will take about 5 minutes.  Add the eggs one at a time, beating well after each is added.  Finally, mix in the dry ingredients and blend until smooth.  Right towards the end of the blending, add in the 1/2 teaspoon of ground cinnamon.


4. Flour/powder sugar the work surface, rolling pin, and your hands.  Working with about one fourth of the dough at a time, roll out until about 1/4" thick and cut with a heart shape cookie cutter.  Transfer the heart cookies to a baking sheet.  
5. Mix together the extra 3 tablespoons of sugar and 1 tablespoon of cinnamon and just before baking, sprinkle with the mixture over each cookie.  Press down gently so that the cinnamon-sugar mixture sinks into the dough.
6. Bake for about 10 minutes, remove from oven, and pull the parchment off the hot baking sheet and set on the counter so the cookies can cool.  


This recipe will make about 20 or 22 cookies....I guess it depends on how much dough you eat.  I always tend to eat way too much dough, so I only got about 20 heart shaped cookies out of this recipe :).  

Enjoy!


Thursday, December 22, 2011

Easy Chocolate Peppermint Cookies


Like many of you out there, I have become a Pinterest addict.  A few weeks ago, I spent hours pinning holiday cookie recipes.  One that kept popping up on my radar was a chocolate cookie made with devil's food cake mix.  It looked super easy -  so I made up my own variation.

Enjoy!


Easy Chocolate Peppermint Cookies {makes about 4 dozen cookies}
-1 box of devil's food cake mix 
-2 tablespoons of melted butter
-2 eggs
-1/4 cup water
-crushed up candy canes...or you could use mint chocolate baking chips
-sprinkles {optional}


1. Put everything {but the candy canes} in a bowl and mix with a wooden spoon.  The dough becomes very stiff, so be prepared to get an arm workout in.
2. Once all is combined, fold in the candy cane pieces.
3. Spread parchment paper out on baking sheets and spray with a little non-stick cooking spray.
4. This dough is stiff, but also very sticky.  To avoid making a mess of everything, I used two small spoons to spoon the dough out onto the baking sheets.  I filled one spoon up with dough and used the other to push it onto the baking sheet.  These cookies will spread, so only use about a quarter sized amount for each cookie.
5. Sprinkle with red and white sprinkles {optional} and bake for about 12 minutes in a 350 degree oven.
6. Remove pans from oven and allow to cool on baking sheets for a few minutes before removing.


Saturday, December 10, 2011

Snickerdoodle Pear Mini Pies

This pie was a total accident.  Luckily, it was a delicious accident.


My husband loves snickerdoodles and always asks me to make them.  I usually just ignore the request, but since it was Thanksgiving weekend, I decided to indulge him.  


The night before Thanksgiving, I whipped up a batch of snickerdoodle dough and baked off half of it.   I stored the rest in the fridge thinking I would finish baking it later that weekend.


The next day {Thanksgiving}, I decided to make two different pies - banana cream and mini pear pies.  I am not a huge pie crust fan, so I used the left over snickerdoodle dough for the mini pear pies.


I wasn't too sure how they would turn out...but they ended up being a-maz-ing.  So good and so easy.  Pie crust can be a bit fussy, but this snickerdoodle crust was the opposite of fussy. If you can make cookies - you can make this crust!


Snickerdoodle Pear Mini Pies {makes 8 pies}


For the filling:
-4 pears, diced {you can also use apples or four cups of fresh berries}
-1 1/2 teaspoon vanilla extract
-2 tablespoons brown sugar


For the Snickerdoodle Crust:
-2 3/4 cups all-purpose flour
-1 teaspoon baking soda
-1/2 teaspoon salt
-1/2 cup shortening
-1/2 cup unsalted butter at room temperature
-1 1/2 cup white sugar
-1 teaspoon vanilla extract
-2 large eggs
-cinnamon + a little sugar for dusting


**Note - you will have snickerdoodle dough left over, feel free to bake it into cookies, freeze it for later, or do what I do - eat it!  I love cookie dough :).


1. In a medium saucepan, cook the pears, brown sugar, and vanilla extract over low heat for about 10 minutes - until they are nice and syrupy.  Remove from heat and set aside to cool.
2. Using an electric mixer, cream together the butter, shortening, and sugar {for the dough}.  Add in the eggs - one at a time - and the vanilla extract.  Mix until all is completely incorporated.
3. In a large bowl, whisk together the flour, baking soda, and salt.  Slowly add these dry ingredients to the mixer and blend until just incorporated.
4. Put the dough into the refrigerator for a few hours so it is nice and firm when you use it for the pies.


5. Line the bottom of small ramekins with a small amount of dough.  Since this dough is much sweeter than traditional pie crust - don't make the lining too thick.  Sprinkle a little cinnamon on top of each pie base and fill the ramekin with the cooked pears.
6. Take another small piece of dough and flatten it into a disc the size of the ramekin.  Cover the top of each dish with one of these discs and sprinkle with a little cinnamon and sugar.  Cut an X into the top of each mini pie and place them all onto a baking sheet lined with foil {mine bubbled over a little}.  
7. Bake at 350 degrees for about 20 minutes - until the top is golden brown. 
8. Allow the pies to cool a little before serving. 


Enjoy these amazing little pies!

Designed by Jackie Ayr