Showing posts with label sunday dessert. Show all posts

Monday, March 10, 2014

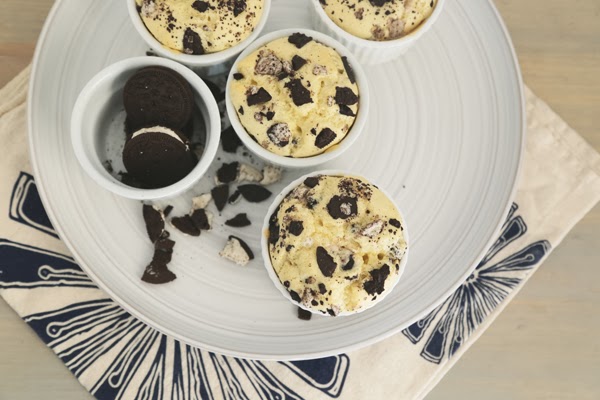
sunday dessert : cookies and cream souffles


I pretty much love cookies and cream anything. These cookies are my absolute favorite so last Sunday I transformed them into super easy, light, and delicious souffles. They were the perfect extra special dessert for a Sunday night spent watching the Oscars.

You can use any "sandwich" cookies in this recipe. My favorite are the Trader Joe's JoJos (their version of Oreos). I think they are so much better than Oreos.  If you haven't tried them, buy some! They're so good. And addicting. 

cookies and cream souffles (makes four)
-5 tablespoons flour
-1/2 teaspoon salt
-1/2 teaspoon baking powder
-2 tablespoons brown sugar
-2 eggs, separated
-3 tablespoons milk
-about 1 teaspoon butter and a little white sugar (for coating the ramekins)
-3 or 4 sandwich cookies, crushed (Oreos or my favorite, Trader Joe's JoJo's)
1. Preheat the oven to 350 degrees.  Prepare two ramekins by coating with a tiny bit of butter {about 1/4 teaspoon per dish} and dusting with a tiny bit of white sugar.

2. In a small bowl, whisk together the flour, salt, baking powder, and brown sugar.  

3. Mix the milk into the dry ingredients and separate the eggs.  Add the yolks to the dry ingredients/milk and put the egg whites in a different bowl.

4. Use an electric mixer to beat the egg whites until soft peaks form.  This should take about 45 seconds to a minute.

5. Gently fold the egg whites into the rest of the ingredients.  Be sure to mix until all is combined but don't over mix. You don't want to lose the volume from the egg whites. Finally, gently fold in about half of the crushed cookies.

6. Pour the batter into the four dishes and top each one with a little of the remaining crushed cookies.

7. Bake for about 20 or 23 minutes...just until the top is golden and puffed up.


Enjoy!  These are SO good.  I know I will be making them again and again.

Tuesday, August 27, 2013

mini blueberry-peach pies


Saturday it all hit me - my jet lag from our Rome/Ireland trip that followed by a busy {and let's get real, at times alcohol soaked} four days in Vegas.  Mix in a stupid cold that stuck around for two weeks and I was exhausted on Saturday.  I slept half the day, woke tired and then went back to bed at 8pm.   The one thing I managed to do all day was make these mini pies and eat.

I also went to the store because we were out of garbage bags.  Although we could have easily gotten by for one day with old grocery bags, I made the trip because Yogurtland is located next to the grocery store. After two mini pies I really needed a massive serving of froyo and candy.  It was just one of those days :).

These pies are the perfect "look like you slaved but they're ridiculously simple" dessert.  Make them and wow everyone with your baking skills.  


mini blueberry-peach pies {makes six mini pies - double for more}

filling
-a cup of blueberries
-two large peaches - chopped
-1/2 teaspoon cinnamon

crust
-1/4 cup sugar
-1/3 cup vegetable oil
-1 teaspoon baking powder
-1 teaspoon vanilla extract
-1/4 teaspoon salt
-1 egg
-1 cup and one tablespoon all purpose flour


1. Preheat the oven to 400 degrees.
2. In a bowl, toss together the blueberries and peaches and cinnamon.  Set aside. 
3. In a second bowl, put all the ingredients for the crust and mix together with a wooden spoon until well combined.
4. Fill six ramekins {or small mugs that are oven safe if you don't have ramekins} with the fruit and top each ramekin with the dough.  I started with a small handful of dough, flattened it into a disc shape, and spread it over the top of the fruit.  Once the dough is pushed to the edge of each ramekin, use a sharp knife and mark the top of each pie with an X.
5. Put the ramekins on a baking sheet {they will spill over!} and bake for about 20 minutes or until the fruit is bubbly and the crust is golden.


I ate mine with a small scoop of vanilla ice cream.  It was perfection.


Thursday, July 11, 2013

sunday dessert - banana cookies and cream ice cream


A few weeks ago, I bought the Jeni's Splendid Ice Cream at Home cookbook and I love it!  I have owned an ice cream maker for over six years and love experimenting with different recipes but none I have tried are as amazing as Jeni's.

When writing her cookbook, Jeni really wanted the at home cook, with the basic ice cream maker, to be able to make good ice cream.  The recipes she developed are perfect for any of us with a simple ice cream maker {like this Cuisnart one that I own} and her flavor combinations are crazy!  So adventurous and unique.  I cannot wait to try them all.

The other day, I used Jeni's base recipe and added a little vanilla extract and pureed banana.  After freezing the mixture in my ice cream maker, I layered it with crushed Trader Joe's JoJo cookies {they're like Oreos}.  You can use any cookies you love or even chocolate chips, candy, etc.  I think M&M's would be amazing in this ice cream.


Vanilla ice cream + banana + crushed cookies or candy is one of my favorite desserts.  This recipe has such a nice banana/vanilla flavor and the crunch from the cookies is perfect.

banana cookies and cream ice cream {base recipe from Jeni's Splendid Ice Cream at Home}
-2 cups whole milk
-1 tablespoon + 1 teaspoon cornstarch
-3 tablespoons softened plain cream cheese
-1/8 teaspoon salt
-1 1/4 cups heavy cream
-2/3 cups sugar
-2 tablespoons light corn syrup {the kind with NO high fructose}
-1 teaspoon vanilla extract
-1 banana, pureed
-1 cup crushed cookies

1. In a small bowl or cup, mix 2 tablespoons of the milk with the cornstarch to create a slurry.  Set aside.
2. Put the cream cheese in a medium bowl {one that will be large enough to hold all the milk, cream, and sugar} and whisk with the salt.  Set aside.
3. Combine the remaining milk, cream, sugar, corn syrup, and vanilla extract in a heavy bottom saucepan and bring to a boil.  Allow to boil for about four minutes and remove from the heat.  You will need to watch the mixture as it is boiling and stir occasionally so that it doesn't boil over and the milk doesn't stick to the sides and bottom of the pan.
4. Add the milk/cornstarch slurry to the pan and return to the heat.  Set over medium-high heat and stir constantly with a wooden spoon or silicone {high heat} spatula.  Make sure you are scraping the sides and bottom of the pan as you are stirring.  After about a minute, the mixture will thicken and you can remove it from the heat.
5. Pour a small amount of the hot mixture over the cream cheese and whisk until smooth.  Gradually pour in the rest of the hot liquid while whisking all together.  Last, whisk in the pureed banana.
6. Now you will need to cool down the mixture before putting it into the ice cream maker.  Jeni's book suggests pouring the liquid into a Ziploc freezer bag and submerging in a bowl of ice water.  I didn't have any freezer bags {I don't buy or use a lot of plastic bags} so instead, I filled a big bowl with ice and cold water and set the bowl with the hot liquid in it for about 30-40 minutes.
7. Finally pour the cooled down mixture into the ice cream maker and churn for about 25 minutes.  You will know it is done when it begins to pull away from the sides.
8. In a large airtight container, layer ice cream, crushed cookies, ice cream, crushed cookies, and so on until all is gone.  Freeze for a few hours before serving.

When you first remove this ice cream from the freezer, it will be very hard and impossible to scoop.  I let it sit on the counter for about ten minutes before scooping.


I have made several variations of this ice cream using Jeni's base and each time it tastes a little better.  The recipe is simple but might take a little practice....so have fun experimenting.  It's summer and the best time of year for ice cream :).


Tuesday, June 11, 2013

sunday dessert - jam filled mini chocolate cupcakes


Confession - I made these little cupcakes on Friday but was still consuming them on Sunday....so it counts as my Sunday dessert.

I am actually a little surprised these lasted until Sunday.  They are mini - so you know how it goes with any mini dessert, you think you can eat ten in one sitting.  Or is that just me?  Mini candy bars are my kryptonite.


I found out Friday morning {via instagram} that it was national doughnut day and immediately had a doughnut craving.  As I drove around, running my usual Friday errands, I was hoping to see a doughnut shop....but I never saw one.  A drive thru Tim Horton's or Dunkin' Donuts would have been ideal but this isn't the Midwest.  Damn you healthy Southern California!

I went home with an unsatisfied sweet tooth craving and decided to make my healthy-ish chocolate cake recipe into mini cupcakes and fill them with this homemade jam.  The homemade jam filling was a last minute decision and I am so glad I did it.

Filling a cupcake or muffin with something sweet makes it instantly more amazing than its unfilled friends.  SO good!  Try them, they aren't too unhealthy and it will be a great way to use up those four pounds of strawberries Trader Joe's tricked you into buying.


jam filled mini chocolate cupcakes
-1/3 cup unsweetened cocoa powder
-1 1/4 cups all purpose flour
-2/3 cups sugar
-1/2 teaspoon salt
-1 teaspoon baking powder
-2 tablespoons canola oil
-1 cup warm water
-homemade {or stor bought} jam - about a cup of it

1. Heat the oven to 350 degrees and grease a mini muffin {or regular size muffin pan} with nonstick cooking spray.
2. In a mixing bowl, whisk together the dry ingredients {cocoa powder, flour, sugar, salt, and baking powder}.  Add the oil and water to the mixing bowl and stir all together.  I like to a use a wooden spoon for this.
3. Fill each muffin cup a little less than half way.  Next, put about 1/2 teaspoon of jam on each muffin, then fill the rest of the cup with more batter.
4. Bake these cupcakes for about 15 to 20 minutes.  Let them cool for a few minutes in the pan and carefully remove them and set on a plate.  
5. Dust with a little powdered sugar and eat! These are best consumed within a few days.  

If you use regular a regular size muffin pan, this recipe will make about 12 large cupcakes.  Since these cupcakes have a low fat content, I find that paper liners stick too much. Instead, I opt for nonstick spray.


Monday, June 03, 2013

sunday dessert - vanilla pear souffles


Remember my recent souffle obsession?  Well, it happened again - this time with pear souffles.

I don't know what to say about these except....go make them right now.

They are light and delicious and kind of perfect.  

The funny thing about taking souffle photos is that they begin to fall as soon as they are removed from the oven.  The first few photos I took, the souffles were nice and poofy but as the photo session went on....they looked flat.   Normal people would just enjoy their dessert, I had to photograph it first.  Blogger problems, right?

Anyways...enjoy!  These are so good.  


vanilla pear souffles {makes 4}
-2 eggs - separated
-1/4 cup flour
-1/2 teaspoon salt
-1/2 teaspoon baking powder
-2 tablespoons powdered sugar
-1 pear - grated 
-1 teaspoon vanilla extract
-2 tablespoons unsweetened vanilla almond milk
-two teaspoons of butter or buttery spread {I used earth balance} and two teaspoons of white granulated sugar

1. In a small bowl, combine the flour, salt, baking powder, and powdered sugar.  Whisk in the two egg yolks, the almond milk, and the vanilla extract.  Finally, grate the pear {peel too} and add to the bowl.  Set aside.
2. In a separate bowl, use an electric mixer to beat the egg whites until peaks form - this will take about a minute.
3. Gently fold the egg whites into the rest of the ingredients.
4. Take a little of the butter or buttery spread and lightly coat the inside of four ramekins.  After buttering, dust the ramekins with a little granulated sugar {about 1/2 teaspoon per dish}.
5. Spoon equal amounts of the batter into each ramekin and bake in a 375 degree oven for about 25 minutes.  The souffles will poof up and brown a little on top.
Serve immediately - these will fall after a short while but they will still taste amazing.

You can experiment with different fruit.  For my next souffle I am going to try berries.


Designed by Jackie Ayr