Wednesday, July 31, 2013

strawberry sweet cream ice cream sandwiches


I love ice cream and I love cookies, so I put these two loves together and make ridiculously good ice cream sandwiches.

I "ruined" one plate by trying to build these when the ice cream was super soft.  Not a good idea.  I thought it would be easier since I could scoop and spread without utilizing any upper body strength but my laziness got the best of me.  The ice cream oozed out of the cookie sandwich and filled the plate with a puddle of ice cream and soft cookies.  

In the end, it was a delicious mistake because I froze it and then had a plate of cookie/ice cream goodness.  Sometimes laziness pays off.

By the time I got to the second plate, I had learned my lesson and used firm ice cream. Tip - build these suckers fast, ice cream melts!


strawberry sweet cream ice cream sandwiches {makes about 18}

for the cookies
-1/2 cup unsalted butter - softened 
-1/2 cup sugar
-1 egg and 1 egg white
-1/4 cup milk {I used non fat but whatever you have is fine}
-1/4 cup International Delight Sweet Cream {if you don't have this on hand, substitute with milk or cream}
-1/2 teaspoon vanilla extract
-2 1/2 cups all purpose flour
-1 1/2 teaspoons baking powder
-1/4 teaspoon salt

for the ice cream
-a pint of vanilla ice cream {you might need a bit more depending on how many cookies you have and how thick you want the filling}
-1 1/2 cup chopped strawberries
-the juice from one half a lemon
-2 tablespoons International Delight Sweet Cream {again, you can skip this and add in honey if you want the strawberries to be super sweet}


1. In a bowl, whisk together the flour, baking powder, and salt and set aside.
2. Use an electric mixer to cream together the butter and sugar.  Let mix for about a minute and add in the eggs and vanilla extract.  Continue to mix until well combined - about another minute.
3. While the mixer is on low, add in 1/3 of the dry ingredients, then the milk, then 1/3 more of the dry ingredients, then the Sweet Cream, then the remaining dry ingredients.  Mix until just combined.
4. This dough is sticky, so lightly flour parchment or waxed paper and roll the dough out onto it.  Using floured hands, make the dough into a log shape, wrap up in the paper and refrigerate for a few hours, until firm.
5. Once the dough is firm, slice in 1/4" thick pieces and lay out on a cookie sheet lined with parchment paper.  Bake in a 350 degree oven for about 10 minutes.  Longer if you want the cookies crisp, but I like mine soft.  Allow the cookies to cool for a few minutes on the cookie sheets then transfer to a plate to cool completely.

6. Once the cools are completely cooled, make the strawberry syrup.  Just chop the strawberries into tiny pieces and put in a small saucepan set over low heat.  Mix in the lemon juice and let the berries cook for about 10 minutes.  They will reduce and thicken.  Remove the mixture from the heat and allow to cool completely.  Once cooled, whisk in the Sweet Cream.
7. In a large bowl, combine the vanilla ice cream and strawberry mixture.  You could just skip all of this and use strawberry ice cream but the flavor from the fresh strawberries is pretty amazing....far better than any standard store bought strawberry ice cream.
8. Pop the bowl of ice cream into the freezer so it hardens.  This is where I messed up and began building my sandwiches that became a soupy delicious ice cream mess.

9. Once the ice cream is firm but still scoop-able, build your sandwiches and immediately place them in airtight containers {lining with parchment paper helps with stacking them on top of each other} in the freezer.


I want to make these again, except as a sort of cake.  My idea is to bake to halves of cookie crust in large sheets and then layer it all in a rectangle pan and slice into sandwich pieces.  I think this will make the sandwich building part a little easier because everything will be able to freeze together.

Also, different kinds of fruit would be amazing - peaches or plums sound pretty good to me :).


Love ice cream + coffee? This summer, International Delight is bringing your favorite Cold Stone Creamery ice cream flavors to coffee and they're celebrating by giving away five $400 grand prizes to throw this summer’s ultimate Ice Cream Social!  To enter, visit the ID + Ice Cream Pinterest board and pin your favorite image using the #IScream4ID hashtag. Good luck!


This is a sponsored conversation written by me on behalf of International Delight. The opinions and text are all mine.

Thursday, July 25, 2013

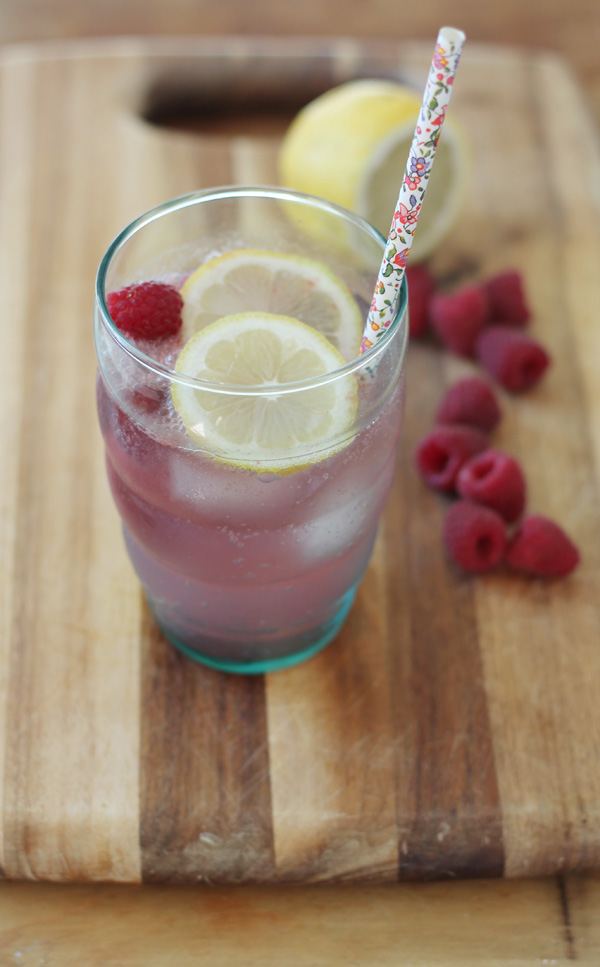
raspberry fizz cocktail


I love a good fruity cocktail but I am not a fan of any drink that's overly sweet.  This raspberry fizz I created a few weeks ago {and cannot stop drinking - I might need help} is the perfect mix of sweet and tart.  It could easily be served as a dessert cocktail at the end of a meal or really.....anytime.  It's so refreshing and perfect for summer.

raspberry fizz cocktail {makes one}
-one scoop raspberry sorbet
-one shot whipped cream vodka {or try a different flavored vodka}
-a few fresh raspberries and lemon slices 
-a small handful of ice
-lemon sparkling water


Put the scoop of raspberry sorbet in the bottom of your glass.  Top with the liquor, ice, berries, and lemon slices.  Fill the rest of the glass with sparkling water and enjoy - it's so delicious!


Thursday, July 18, 2013

dye job


About a month ago, I bought this dress at Target.  I love the dress - it fits so well and can easily be dressed up or down.   The only problem little I had is that I wanted it in navy....and it's only available in black, coral, mint, or cream.  So, I bought the cream and some navy blue dye and a huge cheap bucket {found in the seasonal section for $7} and a pack of rubber gloves because no one needs blue hands.


I have never dyed clothing before but it was really easy.  I just followed the instructions on the bottle and mixed together the suggested amount of boiling water with the suggested amount of dye.  I put a glove on one hand and dunked the dress into the bucket.  The gloved hand stirred the dress around for about 45 minutes.  This part was pretty boring but I guess that is why god invented candy crush and words with friends.  Needless to say, I kept myself entertained :).


After sloshing the dress in the bucket of blue dye, the final step is to "rinse until the water runs clear" which takes forever!  I gave up, hung the dress over the side of the sink and revisited this the next day.  When the water was clear-ish {still a tiny bit murky} I called it a day and threw it in the wash with other dark clothing.

It came out washed and looking nearly perfect.  I totally surprised myself with this one. Before attempting to dye the dress, I  and was fully open to the fact that the end result would be disastrous.  I was hoping for a deep navy blue but this color works.  Certain fabrics will take to dye in different ways and that definitely happened with this dress.  The lining turned gray rather than blue but the contrast is pretty.


If you're in the market for a lace shift dress {aren't we all?} buy this one.  I hope I see it marked down so I can get it in another color or maybe another cream one.  A dip dye look would be amazing.

Top two photos taken by me, the rest are courtesy of Anna Delores Photography for my 2013 fall/holiday line.  All pieces will be available this September.

Tuesday, July 16, 2013

caprese and kale salad


Caprese salad is one of my most favorite salads ever.  It is perfect in the summer when tomatoes are at their best.  Lately I have been building this simple and delicious salad on a bed of kale.  The kale adds a nice crunch and makes me feel a little healthier.  If you aren't a kale fan, use any green you love.


I always top my caprese salads with a splash of balsamic vinegar, a tiny drizzle of olive oil, and sea salt. When Olivari Olive Oil asked me to try out their oil and post on the little things in life for their "year of the little" campaign, I knew I had to share this salad.  It is so simple, yet so amazing.  Totally one of the little things in life that makes me happy :).


caprese and kale salad {serves one}
-a cup {or more} of chopped kale 

-1 large tomato {I have been buying and loving heirlooms this summer}
-1 ounce of fresh mozzarella
-fresh basil {I like a lot}
-a splash of balsamic vinegar
-a tiny drizzle of olive oil {I use about two teaspoons}
-sea salt

To make this salad, just pile the kale onto a plate and top with sliced tomato, mozzarella, and chopped fresh basil.  Drizzle the balsamic and olive oil over the salad and sprinkle on a little bit of sea salt.


Olivari Olive Oil is celebrating "One Year of Little". Visit their Facebook page to learn why the little things are everything.

This is a sponsored conversation written by me on behalf of Olivari . The opinions and text are all mine.


Thursday, July 11, 2013

sunday dessert - banana cookies and cream ice cream


A few weeks ago, I bought the Jeni's Splendid Ice Cream at Home cookbook and I love it!  I have owned an ice cream maker for over six years and love experimenting with different recipes but none I have tried are as amazing as Jeni's.

When writing her cookbook, Jeni really wanted the at home cook, with the basic ice cream maker, to be able to make good ice cream.  The recipes she developed are perfect for any of us with a simple ice cream maker {like this Cuisnart one that I own} and her flavor combinations are crazy!  So adventurous and unique.  I cannot wait to try them all.

The other day, I used Jeni's base recipe and added a little vanilla extract and pureed banana.  After freezing the mixture in my ice cream maker, I layered it with crushed Trader Joe's JoJo cookies {they're like Oreos}.  You can use any cookies you love or even chocolate chips, candy, etc.  I think M&M's would be amazing in this ice cream.


Vanilla ice cream + banana + crushed cookies or candy is one of my favorite desserts.  This recipe has such a nice banana/vanilla flavor and the crunch from the cookies is perfect.

banana cookies and cream ice cream {base recipe from Jeni's Splendid Ice Cream at Home}
-2 cups whole milk
-1 tablespoon + 1 teaspoon cornstarch
-3 tablespoons softened plain cream cheese
-1/8 teaspoon salt
-1 1/4 cups heavy cream
-2/3 cups sugar
-2 tablespoons light corn syrup {the kind with NO high fructose}
-1 teaspoon vanilla extract
-1 banana, pureed
-1 cup crushed cookies

1. In a small bowl or cup, mix 2 tablespoons of the milk with the cornstarch to create a slurry.  Set aside.
2. Put the cream cheese in a medium bowl {one that will be large enough to hold all the milk, cream, and sugar} and whisk with the salt.  Set aside.
3. Combine the remaining milk, cream, sugar, corn syrup, and vanilla extract in a heavy bottom saucepan and bring to a boil.  Allow to boil for about four minutes and remove from the heat.  You will need to watch the mixture as it is boiling and stir occasionally so that it doesn't boil over and the milk doesn't stick to the sides and bottom of the pan.
4. Add the milk/cornstarch slurry to the pan and return to the heat.  Set over medium-high heat and stir constantly with a wooden spoon or silicone {high heat} spatula.  Make sure you are scraping the sides and bottom of the pan as you are stirring.  After about a minute, the mixture will thicken and you can remove it from the heat.
5. Pour a small amount of the hot mixture over the cream cheese and whisk until smooth.  Gradually pour in the rest of the hot liquid while whisking all together.  Last, whisk in the pureed banana.
6. Now you will need to cool down the mixture before putting it into the ice cream maker.  Jeni's book suggests pouring the liquid into a Ziploc freezer bag and submerging in a bowl of ice water.  I didn't have any freezer bags {I don't buy or use a lot of plastic bags} so instead, I filled a big bowl with ice and cold water and set the bowl with the hot liquid in it for about 30-40 minutes.
7. Finally pour the cooled down mixture into the ice cream maker and churn for about 25 minutes.  You will know it is done when it begins to pull away from the sides.
8. In a large airtight container, layer ice cream, crushed cookies, ice cream, crushed cookies, and so on until all is gone.  Freeze for a few hours before serving.

When you first remove this ice cream from the freezer, it will be very hard and impossible to scoop.  I let it sit on the counter for about ten minutes before scooping.


I have made several variations of this ice cream using Jeni's base and each time it tastes a little better.  The recipe is simple but might take a little practice....so have fun experimenting.  It's summer and the best time of year for ice cream :).


Tuesday, July 02, 2013

ahi tuna and citrus salad


I am so not a fish fan.  It takes a lot for me to eat it and usually when I do it eat, I have to choke it down.  It is one of those foods I hated as a child and never grew to love.  

I have a few exceptions to my non-seafood-loving tastes and one of these exceptions is ahi tuna {also tuna sushi, salmon sushi, scallops, and that's it!}.

I often buy a small tuna steak and sear it for about two minutes a side and serve with my favorite Trader Joe's potstickers.  Last week I decided to put the tuna on a salad and added sliced avocados and oranges.  It was perfectly sweet and salty and made a nice little lunch.

ahi tuna and citrus salad {serves two}
-one large orange
-one small avocado or 1/2 of a large one
-2 tablespoons of soy sauce
-6-8 ounce ahi tuna steak
-salad greens
-salt and pepper


1. Drizzle a little canola or olive oil in a heavy saute pan and allow it to get super hot.  While the pan is heating, sprinkle salt and pepper on one side of the tuna steak.  Put the tuna in the hot pan {salt and pepper side down} and sprinkle salt and pepper on the side facing up.  

Cook for about two minutes, flip, and cook for another two minutes.  I like my ahi super pink in the middle...practically raw.  If you prefer it a little more cooked just leave it in the pan for a minute or two more on each side.

2. Remove the tuna from the pan and let cool for a minute while you assemble the salad.
  

3. On a plate, pile salad greens, orange sections, and avocado slices.  If you have never sectioned an orange before, here is a simple video which will show you how to do so...it's super easy.

4. Reserve the orange peels and zest them over the salad.  Finally, drizzle a tablespoon or two of soy sauce over the salad and top with thinly sliced ahi.  

If you need more dressing on your salad, whisk together a little orange juice and soy sauce - it's so good!


Designed by Jackie Ayr