Thursday, November 29, 2012

12 days of merry {day 2} ~ brown bag advent calendar


When I was a kid, we had an advent calendar that my grandma made.  There was a large felt tree and beneath it were 24 little pockets with felt ornaments in them.  I loved this advent calendar.   The countdown to Christmas was the most exciting part.  


This year I made an advent calendar for my niece.  I had a lot of grand ideas but when I remembered I had to ship the thing, I decided to go simple.  

To make the calendar, I used items I already hand on hand - brown paper bags, clothespins, and twine. I created the numbers in photoshop and printed them on sticker paper and I filled each bag with trinkets I got at Target, Michael's, and The Queen Bee Market.

This is pretty much a three year old's dream.  I think I might win the award for aunt of the year....not that I was trying or anything ;). 


Do you have an advent calendar tradition at your house?  


Wednesday, November 21, 2012

let's talk about pricing....again


A little over a year ago, I wrote a post about pricing that has become the most widely read post on my blog.  The fact that it gets so much attention and traffic makes me happy because I want others in the handmade/indie business world to correctly price their items. It is important that we as a community value our work.

I also wrote about pricing and valuing your work on Design*Sponge about a year ago. Obviously it is something I am passionate about :).   My blog has a small reach, but Design*Sponge has a ridiculous reach, so I know the message is out there and I know many of you have the same frustrations.

My personal frustrations stem from the fact low prices hurt the entire handmade community.

After vending at The Queen Bee Market last weekend, I saw so many LOW prices.  As I walked around and shopped, I was constantly impressed with the quality of work and the creativity that each and every seller possessed.  And I will admit, as a shopper, the low prices were enticing but they are damaging in the long run.

Don't get me wrong, many vendors set their prices just right - high enough to make a profit but low enough to be competitive.  However, every few booths, my eyes would pop out of my head when I would spot jewelry priced lower than that at Forever 21 or Claires.  

I know how much certain materials cost and I know that some of these materials are really inexpensive but we cannot forget all the other factors.  Factors such as marketing costs, packaging materials, booth fees, and your time.  Your time and my time is worth SO much more than a few dollars per hour.

The whole pricing issue in the handmade world can be a really frustrating topic.  I know I shouldn't let it frustrate me and I should just focus on my own product and blah, blah, blah.  But this isn't my hobby, this is my livelihood.  And when I see products similar to mine priced for a third of what I sell mine for, I want to scream.

I know so many of you who read this blog are also small business owners and we all struggle with the fine line of making a living and setting fair prices.  It isn't the easiest thing to do.  

When I first opened my business, I was in the mindset that "lower is better," but over the years I have realized that that couldn't be further from the truth.

There is no need to be greedy when pricing, but we do need to focus on fair pricing.  Our culture is addicted to cheap goods but trust me, there is room for reasonably priced goods.  

This is how I price my items ~


When I attend a handmade market,  I am expecting to pay a little more than I would at say, Target.  If we continue to price our items at a Target level, then we will create a thinking that handmade is cheap.  Cheap is a word I would never use to describe my business, so why would I want to give that impression with super low prices?


Wednesday, November 14, 2012

eggnog muffins


I am a big eggnog fan.  I bought a bottle last week and have been putting it in my coffee every morning.  All of a sudden it's Christmas.

I also love an eggnog cocktail.  I make mine with a shot of grand marnier liquor.  So good.

I love eggnog and I love muffins, so I combined the two and made eggnog muffins.  The taste is so... eggnog-ey.  That is the best adjective I can use to describe these muffins.  That and delicious.  


Eggnog Muffins {makes 12 large muffins - recipe adapted from here}
-2 1/4 cup all purpose flour
-3/4 cup sugar
-2 teaspoons baking powder
-1/2 teaspoon ground nutmeg
-1/2 teaspoon salt
-2 eggs
-1 cup eggnog {I used low fat}
-1/4 cup butter, melted and cooled
-1/4 cup non fat plain greek yogurt
-1 1/2 teaspoon vanilla extract

Streusel Topping
-2 tablespoons cold butter, cut into small pieces
-2 tablespoons brown sugar
-2 tablespoons flour
-1/2 teaspoon ground nutmeg


1. Preheat the oven to 375 degrees and grease a muffin tin or line with muffin wrappers.
2. In a large bowl, sift together the flour, baking powder, nutmeg, salt, and sugar.  
3. In a separate bowl, whisk together the eggs, eggnog, melted butter, yogurt, and vanilla extract.
4. Add the wet ingredients to the dry and stir together.  The batter will be a little lumpy, which is fine.
5. Make the streusel topping by cutting together all the streusel ingredients.  I use a pastry blender but you can use two knives or zap everything in the food processor.
6. Spoon equal amounts of batter into the muffin pan and top with the streusel topping. Bake for 20 minutes.


Enjoy!


Tuesday, November 06, 2012

Ikea Hack - Dining Room Table


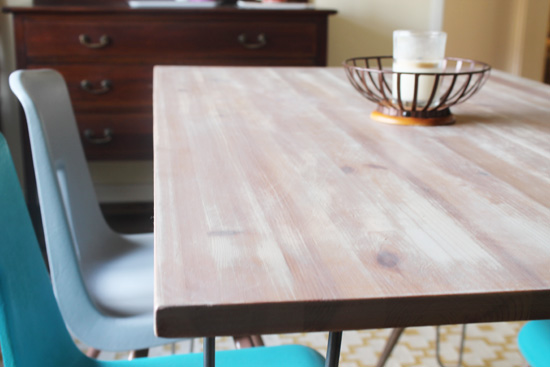
Last week I performed a little Ikea hack on my dining room Ikea Jokkmokk table.  My initial idea was to remove the legs, replace them with hairpin legs, then sand and re-stain the top.

I will admit, I often have grand diy ideas but my execution often doesn't pan out.  I am happy to say that this time around, everything worked perfectly.  My table turned out better than I could have imagined and I absolutely LOVE it.  Plus the whole hack was SO simple....just a few easy steps.

Remove legs and trim - just a few screws.

I used this $30 Black & Decker sander and the stain I chose was RustOleum Sunbleached.

I bought hairpin legs from this shop on eBay for $50 and screwed them to each of the four corners.  I placed each one about an inch in from the edge.


Ta-da!


That is all I did.  Besides drying time in between the two coats of stain, this whole project took less than an hour.  I love when projects are super simple and produce big results.


I think it looks SO much better and my favorite part is that I now have an original table.


Designed by Jackie Ayr