Showing posts with label decorating. Show all posts

Thursday, June 06, 2013

diy window chalkboard


A few weeks ago Wonderland and Company sent me a sample of their Plaster Paint.  Plaster Paint is somewhat like chalkboard paint, but different because it can be used as regular paint to redo furniture, etc.

Well, I think this is how it's different.  I have never actually used chalkboard paint.  Sorry, revoke my blogger/crafter/diy-er license if you must.

Annnnnyways, I decided to use my sample of gray plaster paint and makeover a window pane.  Last summer we got new windows in our kitchen and the old ones have been sitting in my garage...waiting to be used.

Plaster paint is super simple to use.  You don't have to sand or prime any surface and it can be used on anything - wood, metal, or glass.

The first thing I did was tape the edges of the window {I'm a sloppy painter} and spray the glass with frosted glass.  I have painted clear glass a few times and starting off with a coat of frosted glass makes it so much easier to get full coverage in one or two coats.


Next I painted, waited for it to dry {plaster paint dries fairly quickly}, lightly sanded with fine grit sandpaper, and added a top coat of the wax that came with the paint.


I created a weekly mail planner on the board using chalk pens....chalk pens are much easier to write with than normal chalk. If you look closely at my board and the meals I wrote in, you will notice that I cannot write with regular chalk.  I need to go back to kindergarten :).

The meal planner was Neil's idea.  Last week he said to me "you know what we should have? A weekly meal plan!"  Like it was the most genius idea ever.   

Typically, he travels a few days a week and dinners are his own problem.  But, ever since the beginning of May he has been right here in San Diego, home every night, asking me "what's for dinner?"

I love to cook, but wow am I sick of this every.single.night thing.  I guess chips and salsa doesn't qualify as "dinner" in Neil's world.  But, I do love my meal planner.  Hopefully it will result in lots of glorious dinners and not so many frozen Trader Joe's meals....and hopefully Neil starts travelling again soon.

Wednesday, May 01, 2013

before & after - bar sideboard


I bought this big chunk piece of furniture at Goodwill three years ago.  It is a good quality piece and I assume some sort of vintage {although I don't know how old}.  I remember eyeing this piece at Goodwill and loving how unique it was, so I paid the $45 and took it home.  

The bar in its original state.

The piece was originally intended to be a bar.  If you lift the top, there is a faux marble shelf for mixing drinks and a mirror that says "Ollie's Saloon."  I left the mirror for the kitsch factor.   The doors {which I removed} have holders for glasses and bottles.   I have them in the garage and they can always be reinstalled but I could not handle stripping anymore paint

At the time I bought this bar, we were living in a much smaller house and I had no room for a bar sideboard in our dining or living room.  So, I decided to put it in my guest room/studio for storage.  I sanded off the original stain and painted it a very pale mint green.


This piece sat in the guest room/studio for months and was perfect.  When we moved to our current house, I knew I wanted to re-do it {again} and bring it back to its bar glory, but with a facelift.  

That was three years ago.  I work slow ;).  

The bar has sat in my kitchen holding wine, water, beer, and all sorts of other junk.  The minty green color was simply wrong for the kitchen and I was sick of it.  

In order to transform my bar, I decided to add small tapered legs {bought here} to give it a sleeker look.  I also stripped the paint, stained the wood a rich color, painted the interior, and removed the doors. 

I love the new legs.  I stained them the same color as the bar and painted the feet {which were silver} with copper craft paint.

Stripping paint is SO much work.  I had no idea.  I tried a homemade solution but all it did was create a big goopy mess. Then I attempted to just sand off the paint.  Yeah, no.  Don't ever do that.

Finally I went to Lowe's and found an all natural, low odor paint thinner that worked like a charm.  The paint peeled off in strips.  


Once I had the paint off the piece, I had to sand, which was crazy tedious.  The edges of this piece have all sorts of grooves so I had to use my larger sander, my dremel tool, and sand paper. I scraped away until all the little specks of paint were removed.  It was such a pain in the ass.

Lesson learned - never paint a piece of furniture again unless I want it to stay that way forever!

I was going to keep the doors in tact, but they have a lot of grooves and I lost patience with the sanding/stripping/scraping that was involved in this project.  So, I decided to make the bar door-less.

Since this piece was going to be open, I knew the inside needed some work.  I went with turquoise for the bottom, back, and shelf and gray for the sides.  If I get sick of the color, I can always refinish the doors and reattach them.  


This little project ended up taking me three weekends {partly due to the fact that I easily lost patience with the scraping and sanding} and cost about $30 {paint, stain, and the new tapered legs}. I already had lots of sand paper and painter's tape.


I love the end result.  It fits perfectly in our dining room and adds a little bit of unique style.  


Above the bar I hung three oversized photos I had printed at Staples.  All three were taken last Christmas when we were in Ireland.   The black and white photos only cost about $3 to print and the colored one was $20.


Details 
Interior blue paint - Martha Stewart sunken pool {a sample size was sufficient}
Interior gray paint - Martha Stewart winter's day {a sample size was sufficient}
Wood stain - Minwax English Chestnut {8 oz size was sufficient}


Wednesday, April 24, 2013

diy - make your own side table


Last weekend I made a simple side table for my kitchen.  It was super easy and I love it.  It's sleek and functional and since I made it, it is exactly the right size.

My first idea for this space was a single tiered table with tapered legs.  My friend Liz posted about these tapered legs on Facebook and my mind immediately began churning with ideas. 

I was all set to make a basic table {top and four legs} until I realized that the tapered table legs on this site were max 28" high.  Since the table is in my kitchen, I wanted it to be counter height, which is typically about 36" high.

I looked around online for 34-36" tapered legs {or something similar} but an affordable version does not exist.  I was about to admit defeat until I got the idea to make the table two tiered.  It's perfect because I was able to achieve the correct height {and still not spend a lot of money} and I have a little shelf for storage.  I.Love.Storage.

Here is what I did to make my little table.  Trust me, very little wood working skills are required.  All you need is a drill and some patience. And maybe a dremel or a little saw.

Supplies 
-8 table legs and 8 brackets for attaching the legs.  Make sure you buy the brackets that are meant for these legs.  They can be found at Lowe's, Home Depot, etc, or online.  I used four 28" round tapered legs and four 8" round tapered legs***

-two wood boards - to fit the spot in my kitchen, I needed boards sized 36"x16".  I figured I would have to get a larger piece of wood cut to size at Lowe's but they actually sell wood boards meant for shelves and they had 36"x16" wood shelves.  Perfect!

-wood stain - I used Rust-Oleum in sunbleached {I love this stain and also used it for my dining room table}

-sand paper {the edges of the boards might need a little buffing}

-screws

***Note about the second, shorter set of legs....you could easily substitute four small pieces of wood in a square or cylinder shape.  They sell long pieces at Home Depot or Lowe's and they will cut them to any size for you.  I will explain below but this is likely an easier option than the four short legs.

Step One
Stain or paint the legs and the boards.  Allow to dry {I left them overnight}.

Step Two
Take the board that will be the table top and attach four brackets to the underside of the board {one in each corner}.

Step Three
In order to attach the short legs to the bottom wood board, I had to remove the metal feet and then saw down the legs. Removing the metal feet is a total pain, which is why I recommend buying a cylinder or rectangle piece of wood and having it cut into four equal lengths.  

If you decide to use the shorter legs, pry off the metal feet and cut off the wood that remains.  I used my dremel tool to saw off the little stub of wood that remains once the metal feet are removed.

Step Four
Take your table top {the one with the four brackets screwed into it} and flip it over so that you are looking at the brackets.  Take each leg short leg and screw it in place.  

If you opt to use basic pieces of wood, rather than the short legs, I suggest using wood glue and small brackets to hold the pieces in place.

Step Five
Take the second board {the one that will serve as the "shelf}, flip it over and place it on the bottom of the small feet.  Make sure it is lined up correctly and screw in medium length crews through the bottom of the board and into the bottom of the short table legs}.

Step Six
Finally, attach the remaining four table leg brackets to the bottom of the lower board {the one that is now screwed into the smaller legs} and screw in the long table legs.  

Flip over and you have a table!

I got really engrossed in what I was doing and forgot to take any in-progress photos.  I feel like I need to make Ikea-like instruction drawings for you guys!  If you plan on making something similar and have any questions, feel free to leave them in the comments :).

I still need to get a few bins for the small shelf.  I want something in a different color than gray.  I bought these two boxes at an antique store on Saturday.  I love them, but for this shelf I ned something functional.  I am keeping my eyes peeled for something that will hold stuff.  I feel like I spend half my buying time purchasing items to hold other items.

This project cost me about $70 {I already had sand paper, wood stain, and screws}.  It definitely wasn't the least expensive project I have ever tackled, but considering the result, I think $70 was a pretty good deal.


Have you ever done a wood working project?  This is the first thing I made from "scratch"{meaning not a furniture makeover} and it was so fun!  My husband wants me to make a coffee table next and I am already dreaming up ideas.....


Thursday, April 04, 2013

shelves!


Last week I finally got around to doing two shelving projects I have had in my head for months.  It feels good to get things organized and cross projects off my to-do list!

The first project was a super simple solution for all my makeup, perfumes, etc that are always all over the place.  I bought three small wood crates at Michaels.  These sell for about $6.99  each but I always get them on sale or with a coupon.  

I spray painted two of them white and one of them gold them hung them up with 3M Command Picture Hanging Strips.   

I am obsessed with these things.  I know they are a little pricey but my gawd, they make hanging stuff so easy.   And I can now hang pictures straight, so they are worth every penny.

I filled each shelf with makeup, perfumes, lip glosses, nail polishes, etc.  Everything is so tidy now - I love it!


The second shelf project I tackled was a thrift store re-do and slightly more invoved than my crate shelving.  

About six months ago, I bought this shelf at The Salvation Army for around $7.  I hated the heart and knobby, country style hooks and trim but I loved the potential in all the little nooks and tiny shelves.


This is how I changed it - not anything difficult, just a little time consuming....

Step one - take off the ugly bits.  I used a hand saw {not electric - my husband thinks a power saw would be "dangerous"} and cut off the top and bottom portions so I was left with a square shaped shelf.


Step two - sand.  I used my electric sander to take off the old stain.  Most of the little nooks were too small for the electric sander so I ended up sanding a lot of this piece by hand.  It wasn't fun.  Sanding by hand is time consuming.

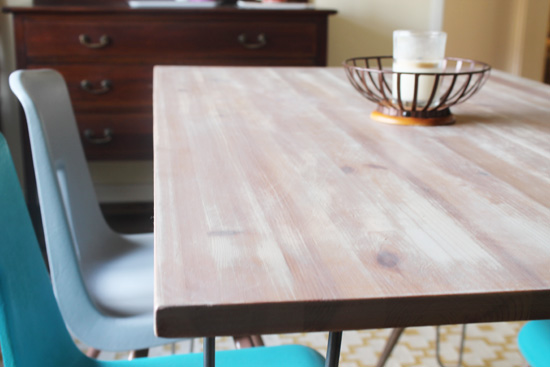
Step three - stain.  After the piece was completely sanded, I stained it with rust-oleum stain in sunbleached {the same stain I used on my Ikea hack dining table - love this color!}.

I put on a super light coat of stain, let it dry for several hours, then added a second coat and let it dry overnight.

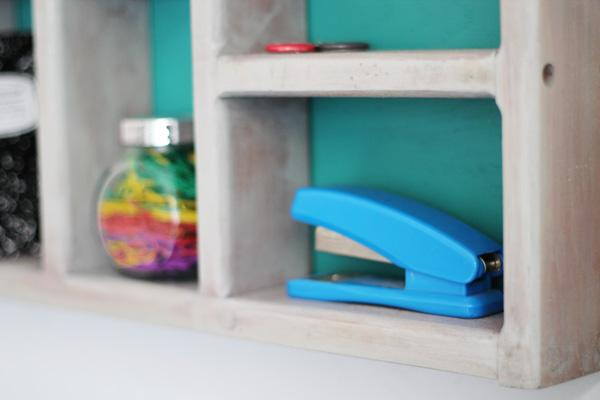
Step four -  the back.  In order to make a back for the shelf, I bought a square piece of plywood at Lowe's and cut it to the correct dimensions with my small dremel rotary tool {it works well when cutting thin pieces of wood}.  After cutting the plywood, I painted it with teal paint that I had leftover from a previous project.  I let the paint dry for a few hours, then used several small nails to attached the painted plywood to the back of the shelf.


Step five - hang.  I didn't think 3M Command Strips would be strong enough for this heavy shelf, so I attached brackets to the back and hung it with good old fashioned nails.


I ended up hanging it to the left of my desk {above my printer} and it is the perfect piece for all those little things that end up collecting in my desk drawers or crowding my desktop.


Have you completed any thrift store re-do's lately?  Or do you avoid buying thrifted "project" pieces?  I try to avoid the project pieces but my imagination often gets the best of me.....it's a good thing we have a big garage :).


Tuesday, November 06, 2012

Ikea Hack - Dining Room Table


Last week I performed a little Ikea hack on my dining room Ikea Jokkmokk table.  My initial idea was to remove the legs, replace them with hairpin legs, then sand and re-stain the top.

I will admit, I often have grand diy ideas but my execution often doesn't pan out.  I am happy to say that this time around, everything worked perfectly.  My table turned out better than I could have imagined and I absolutely LOVE it.  Plus the whole hack was SO simple....just a few easy steps.

Remove legs and trim - just a few screws.

I used this  Black & Decker sander and the stain I chose was RustOleum Wood Stain.

I bought hairpin legs from on eBay for $50 and screwed them to each of the four corners.  I placed each one about an inch in from the edge.
(similar hairpin legs)


Ta-da!


That is all I did.  Besides drying time in between the two coats of stain, this whole project took less than an hour.  I love when projects are super simple and produce big results.


I think it looks SO much better and my favorite part is that I now have an original table.


Designed by Jackie Ayr