Thursday, April 25, 2013

super simple berry crumble


Crumble {or crisp...according to wikipedia they are interchangeable} is pretty much the easiest dessert ever.  It is also a somewhat healthy dessert option.  I use very little added sugar, letting the fruit do the sweetening.

Last weekend I made berry crumble.  As it gets nearer to summer, berries are getting so much tastier and so much cheaper.  I eat berries year round but spring and summer means crazy amounts of berry consumption in this house. 

My recipe makes about three servings because the baking dish I use is fairly small.  If you want more, or are going to use a square baking dish, just double the amounts below.

super simple berry crumble {serves about three...more if you use it as an ice cream topping}
-two cups of fresh berries {I used a mix of strawberries and blackberries}
-1 1/2 tablespoons flour
-1 1/2 tablespoon butter {cold and cut into tiny pieces}
-1/2 tablespoon sugar
-tiny pinch of salt {around 1/8 a teaspoon}
-1 tablespoon honey

1. Pre-heat the oven to 350.
2. Slice berries {if necessary} and put them in the baking dish.  Top with the one tablespoon of honey.
3. In a separate bowl, use a pastry cutter or two knives to combine the flour, butter, sugar, and salt.  Once combined {it should resemble tiny little pebbles and not much of the flour should be "lose"} sprinkle it over the berries.
4. Bake for about 35 minutes, until nice and brown on top and bubbling on the bottom.  Serve with a scoop of vanilla ice cream or whipped cream or both :).

YUM!

Wednesday, April 24, 2013

diy - make your own side table


Last weekend I made a simple side table for my kitchen.  It was super easy and I love it.  It's sleek and functional and since I made it, it is exactly the right size.

My first idea for this space was a single tiered table with tapered legs.  My friend Liz posted about these tapered legs on Facebook and my mind immediately began churning with ideas. 

I was all set to make a basic table {top and four legs} until I realized that the tapered table legs on this site were max 28" high.  Since the table is in my kitchen, I wanted it to be counter height, which is typically about 36" high.

I looked around online for 34-36" tapered legs {or something similar} but an affordable version does not exist.  I was about to admit defeat until I got the idea to make the table two tiered.  It's perfect because I was able to achieve the correct height {and still not spend a lot of money} and I have a little shelf for storage.  I.Love.Storage.

Here is what I did to make my little table.  Trust me, very little wood working skills are required.  All you need is a drill and some patience. And maybe a dremel or a little saw.

Supplies 
-8 table legs and 8 brackets for attaching the legs.  Make sure you buy the brackets that are meant for these legs.  They can be found at Lowe's, Home Depot, etc, or online.  I used four 28" round tapered legs and four 8" round tapered legs***

-two wood boards - to fit the spot in my kitchen, I needed boards sized 36"x16".  I figured I would have to get a larger piece of wood cut to size at Lowe's but they actually sell wood boards meant for shelves and they had 36"x16" wood shelves.  Perfect!

-wood stain - I used Rust-Oleum in sunbleached {I love this stain and also used it for my dining room table}

-sand paper {the edges of the boards might need a little buffing}

-screws

***Note about the second, shorter set of legs....you could easily substitute four small pieces of wood in a square or cylinder shape.  They sell long pieces at Home Depot or Lowe's and they will cut them to any size for you.  I will explain below but this is likely an easier option than the four short legs.

Step One
Stain or paint the legs and the boards.  Allow to dry {I left them overnight}.

Step Two
Take the board that will be the table top and attach four brackets to the underside of the board {one in each corner}.

Step Three
In order to attach the short legs to the bottom wood board, I had to remove the metal feet and then saw down the legs. Removing the metal feet is a total pain, which is why I recommend buying a cylinder or rectangle piece of wood and having it cut into four equal lengths.  

If you decide to use the shorter legs, pry off the metal feet and cut off the wood that remains.  I used my dremel tool to saw off the little stub of wood that remains once the metal feet are removed.

Step Four
Take your table top {the one with the four brackets screwed into it} and flip it over so that you are looking at the brackets.  Take each leg short leg and screw it in place.  

If you opt to use basic pieces of wood, rather than the short legs, I suggest using wood glue and small brackets to hold the pieces in place.

Step Five
Take the second board {the one that will serve as the "shelf}, flip it over and place it on the bottom of the small feet.  Make sure it is lined up correctly and screw in medium length crews through the bottom of the board and into the bottom of the short table legs}.

Step Six
Finally, attach the remaining four table leg brackets to the bottom of the lower board {the one that is now screwed into the smaller legs} and screw in the long table legs.  

Flip over and you have a table!

I got really engrossed in what I was doing and forgot to take any in-progress photos.  I feel like I need to make Ikea-like instruction drawings for you guys!  If you plan on making something similar and have any questions, feel free to leave them in the comments :).

I still need to get a few bins for the small shelf.  I want something in a different color than gray.  I bought these two boxes at an antique store on Saturday.  I love them, but for this shelf I ned something functional.  I am keeping my eyes peeled for something that will hold stuff.  I feel like I spend half my buying time purchasing items to hold other items.

This project cost me about $70 {I already had sand paper, wood stain, and screws}.  It definitely wasn't the least expensive project I have ever tackled, but considering the result, I think $70 was a pretty good deal.


Have you ever done a wood working project?  This is the first thing I made from "scratch"{meaning not a furniture makeover} and it was so fun!  My husband wants me to make a coffee table next and I am already dreaming up ideas.....


Thursday, April 18, 2013

sausage-potato salad


Ok, so you might be thinking that sausage and potatoes should not be in the same sentence as salad.  But, hear me out....this little combo is one of those meals that is comforting and feels a little unhealthy but it is actually a really great healthy option.  I love when a healthy salad tastes like delicious comfort food.

This salad was inspired by an appetizer/snack a friend of mine always makes.  She puts pieces of chicken sausage, potato, and arugula on a skewers and serves with a mustard dipping sauce.  So simple and so good!  I can eat like fifty of them in one sitting.


sausage-potato salad {for one}
-salad greens {any type will do}
-one chicken sausage {my favorite is Trader Joe's sundried tomato}
-one small golden potato {a little smaller than the palm of your hand}
-honey mustard dressing {my favorite is Newman's Own lite honey mustard}

Chop the potato into small pieces and put it in the microwave {or boil until just fork tender} for three minutes.  While the potato is cooking, cut the sausage into small pieces and toss in a non-stick skillet to brown and heat through.

Once the potato is fork tender, throw it in the pan with the sausage for a minute so that it can brown a little.

Fill a plate with salad greens, top with the warm potato and sausage and drizzle with a little dressing.  Perfection.


Tuesday, April 09, 2013

thai peanut kale salad


My GOD, this salad is amazing.  I made it a week ago and ate it for lunch and dinner until it was gone.    When I find something I love, I pretty much eat it non-stop.  I go through phases with certain foods, eat them for a month straight, get sick of them, and switch to something else.  This salad is on the current favorite food rotation.

I got the idea for this delicious salad from this recipe post and created something similar based on my favorite "thai" ingredients.

I eat kale a lot and am really starting to like it.  At first I just ate it because I was supposed to, but now I love having it as a staple in my diet.  If you are a kale hater, this recipe does a great job of fooling anyone into eating kale.  It's sweet and peanut-ey and perfect. 


thai peanut kale salad {makes about four servings}
-1 large bowl of kale, chopped thin {I used one large bunch, removed the tick stems and thinly chopped}
-1 cup of shredded carrots {I bought pre-shredded}
-1 cup of shelled edamame beans {I bought frozen and steamed them}
-Add any other veggies you love....thinly sliced bell peppers and cucumbers would be amazing.    Maybe even some scallions or thinly sliced red cabbage.   Note, if you up the amount of veggies by a lot, you will want to double the dressing recipe.  The recipe below is really only enough for the kale, carrots, and edamame.


peanut dressing
-2 heaping spoonfuls of creamy all natural peanut butter {about 1/4 cup}
-1 tablespoon apple cider vinegar
-the juice from two limes
-2 tablespoons honey
-freshly grated ginger - about a tablespoon
-1 clove of garlic, crushed
-1 1/2 tablespoon of low sodium soy sauce

1. Put your veggies in a bowl and set aside.
2. Measure out the peanut butter in a seperate small bowl and microwave for about 20 seconds, just until it's easy to stir.  Whisk in the rest of the dressing ingredients and taste.  If it needs more salt, throw in a dash more of soy sauce.  If it is too bitter, an extra squeeze of honey.
3. Pour the dressing over the veggies and toss to coat.  Eat right away or refrigerate for up to 3 days.


I have been eating this salad with my favorite Trader Joe's potstickers.  It is the perfect, healthy, and quick lunch or dinner.


Thursday, April 04, 2013

shelves!


Last week I finally got around to doing two shelving projects I have had in my head for months.  It feels good to get things organized and cross projects off my to-do list!

The first project was a super simple solution for all my makeup, perfumes, etc that are always all over the place.  I bought three small wood crates at Michaels.  These sell for about $6.99  each but I always get them on sale or with a coupon.  

I spray painted two of them white and one of them gold them hung them up with 3M Command Picture Hanging Strips.   

I am obsessed with these things.  I know they are a little pricey but my gawd, they make hanging stuff so easy.   And I can now hang pictures straight, so they are worth every penny.

I filled each shelf with makeup, perfumes, lip glosses, nail polishes, etc.  Everything is so tidy now - I love it!


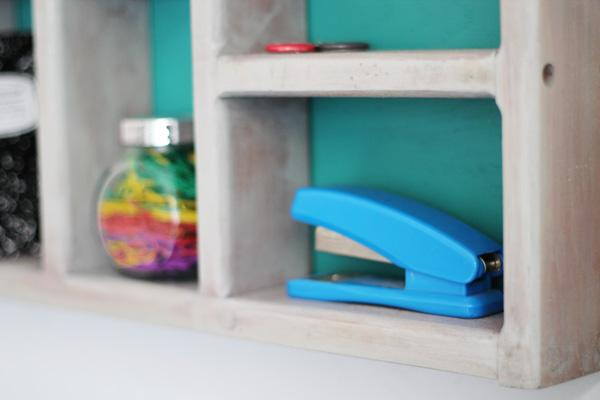
The second shelf project I tackled was a thrift store re-do and slightly more invoved than my crate shelving.  

About six months ago, I bought this shelf at The Salvation Army for around $7.  I hated the heart and knobby, country style hooks and trim but I loved the potential in all the little nooks and tiny shelves.


This is how I changed it - not anything difficult, just a little time consuming....

Step one - take off the ugly bits.  I used a hand saw {not electric - my husband thinks a power saw would be "dangerous"} and cut off the top and bottom portions so I was left with a square shaped shelf.


Step two - sand.  I used my electric sander to take off the old stain.  Most of the little nooks were too small for the electric sander so I ended up sanding a lot of this piece by hand.  It wasn't fun.  Sanding by hand is time consuming.

Step three - stain.  After the piece was completely sanded, I stained it with rust-oleum stain in sunbleached {the same stain I used on my Ikea hack dining table - love this color!}.

I put on a super light coat of stain, let it dry for several hours, then added a second coat and let it dry overnight.

Step four -  the back.  In order to make a back for the shelf, I bought a square piece of plywood at Lowe's and cut it to the correct dimensions with my small dremel rotary tool {it works well when cutting thin pieces of wood}.  After cutting the plywood, I painted it with teal paint that I had leftover from a previous project.  I let the paint dry for a few hours, then used several small nails to attached the painted plywood to the back of the shelf.


Step five - hang.  I didn't think 3M Command Strips would be strong enough for this heavy shelf, so I attached brackets to the back and hung it with good old fashioned nails.


I ended up hanging it to the left of my desk {above my printer} and it is the perfect piece for all those little things that end up collecting in my desk drawers or crowding my desktop.


Have you completed any thrift store re-do's lately?  Or do you avoid buying thrifted "project" pieces?  I try to avoid the project pieces but my imagination often gets the best of me.....it's a good thing we have a big garage :).


Wednesday, April 03, 2013

mocha banana shake


I love making coffe milkshakes in the afternoon when I want a little sweet snack/pick me up.  Typically, I blend a cup of cold coffee {leftover} with chocolate soy milk or vanilla almond milk, maybe a scoop of ice cream, and some ice.

I think this is the perfect afternoon treat, so when Silk asked me to try out their new soy milk latte drinks, I was happy to oblige.  I buy Silk products all the time {the chocolate soy and unsweetened vanilla almond milk are my faves} and the new latte drink did not disappoint.  Truthfully, it's a lot better than I expected.  The drink has a nice coffe-chocolate taste ratio and is not super sweet.  I like a little sweetness in coffee drinks, but I hate when they are sting-the-back-of-my-throat-sweet.  

The best part of the new Silk latte drinks is that they have no artificial sweeteners and are just 100 calories per serving.  I cannot stand the taste of artificial sweeteners.  Give me real sugar any day of the week.

My mocha banana shake is just 150 calories but tastes super rich.  Neil actually walked in the kitchen as I was enjoying it, tasted it, and was shocked that it wasn't an actual ice cream shake.

Mocha Banana Shake {makes one}
-1 small banana {or 1/2 a large one}, frozen
-1/2 cup Silk Mocha Latte
-whipped cream {optional}


All you need to do to make this shake is slice a banana, freeze it for a few hours, and blend it for about 3 minutes with the Silk mocha latte.  Pour in a glass and top with a little whipped cream.  Prepare to enjoy it - seriously SO good!

If you have never blended a frozen banana before, you are in for a treat.  Blending a frozen banana for a few minutes creates a soft serve like consistency and it is so amazing.  It's not quite soft serve, but it's a pretty close second and so much healthier :).


Silk is offering all of you a dollar off coupon of their new ice latte drinks - just click the image at the bottom of this post....go get some!


This is a sponsored conversation written by me on behalf of Silk. The opinions and text are all mine.

Continue this conversation on twitter using the hashtag #TasteSilk and tagging @LoveMySilk
Designed by Jackie Ayr