Last week I finally got around to doing two shelving projects I have had in my head for months. It feels good to get things organized and cross projects off my to-do list!
The first project was a super simple solution for all my makeup, perfumes, etc that are always all over the place. I bought three small wood crates at Michaels. These sell for about $6.99 each but I always get them on sale or with a coupon.
I spray painted two of them white and one of them gold them hung them up with 3M Command Picture Hanging Strips.
I am obsessed with these things. I know they are a little pricey but my gawd, they make hanging stuff so easy. And I can now hang pictures straight, so they are worth every penny.


I filled each shelf with makeup, perfumes, lip glosses, nail polishes, etc. Everything is so tidy now - I love it!

The second shelf project I tackled was a thrift store re-do and slightly more invoved than my crate shelving.
About six months ago, I bought this shelf at The Salvation Army for around $7. I hated the heart and knobby, country style hooks and trim but I loved the potential in all the little nooks and tiny shelves.

This is how I changed it - not anything difficult, just a little time consuming....
Step one - take off the ugly bits. I used a hand saw {not electric - my husband thinks a power saw would be "dangerous"} and cut off the top and bottom portions so I was left with a square shaped shelf.

Step two - sand. I used my electric sander to take off the old stain. Most of the little nooks were too small for the electric sander so I ended up sanding a lot of this piece by hand. It wasn't fun. Sanding by hand is time consuming.
Step three - stain. After the piece was completely sanded, I stained it with rust-oleum stain in sunbleached {the same stain I used on my Ikea hack dining table - love this color!}.
I put on a super light coat of stain, let it dry for several hours, then added a second coat and let it dry overnight.
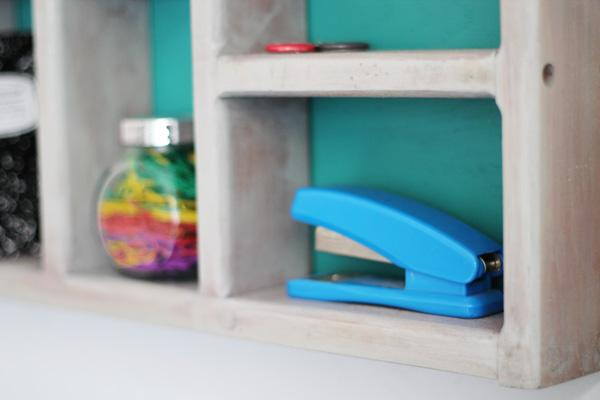
Step four - the back. In order to make a back for the shelf, I bought a square piece of plywood at Lowe's and cut it to the correct dimensions with my small dremel rotary tool {it works well when cutting thin pieces of wood}. After cutting the plywood, I painted it with teal paint that I had leftover from a previous project. I let the paint dry for a few hours, then used several small nails to attached the painted plywood to the back of the shelf.

Step five - hang. I didn't think 3M Command Strips would be strong enough for this heavy shelf, so I attached brackets to the back and hung it with good old fashioned nails.

I ended up hanging it to the left of my desk {above my printer} and it is the perfect piece for all those little things that end up collecting in my desk drawers or crowding my desktop.


Have you completed any thrift store re-do's lately? Or do you avoid buying thrifted "project" pieces? I try to avoid the project pieces but my imagination often gets the best of me.....it's a good thing we have a big garage :).
Wonderful!
ReplyDeleteAt first I was shocked you'd get rid of the heart and everything, but when I saw the end result I loved it. Great makeover<3
blueeyednightowl.blogspot.com
thanks! the heart is cute it just isn't my style....I wanted something simpler :).
DeleteGreat inspiration for the old piece - I would have never thought to chop off all the old stuff! I'll be on the hunt for one of these now so I can re-do it!
ReplyDeleteI see them at thrift stores all the time!
DeleteGina this looks awesome!
ReplyDeletethanks dana! i love the final result :).
DeleteI love the shelves you have with the makeup! :)
ReplyDeletexx Denysia Yu
http://denysiayu.blogspot.com
I'm impressed that you put up shelves and didn't fill them all up right away, that's what always happens to me. Which probably means that I should have bought shelves a long time ago...
ReplyDeleteThese shelving projects turned out amazing! Really loving that larger shelf you put next to your desk. It's much more clean looking. Good work! Thanks for sharing! Xo M&K at brewedtogether.com
ReplyDeleteBeautiful!! Both projects turned out wonderful. Thanks for sharing :)
ReplyDeletenice
ReplyDeleteTrees produce oxygen, get airborne particulates, and decrease debilitate cloud, overhauling a gathering's respiratory wellbeing. The urban sanctuary direct adds to meeting a city's authoritative clean air these details.
ReplyDeleteNorton com Setup
ReplyDeletewww Mcafee Activate
Thanks for this blog, I really enjoyed reading your post.
ReplyDeleteBrother Printer Support
brother printer customer care phone number
Sbcglobal Support Phone Number
ReplyDeleteCustomer Service Number for Yahoo Mail
Thanks for sharing such a nice Blog.I like it.
ReplyDeleteactivate my norton product key
mcafee.com activate key
Outlook Phone number
Microsoft Edge Phone number
wonderhowto
ReplyDeletepathpedia
webhostingdiscussion
fanbuff
Thanks for sharing such a nice Blog.I like it.
ReplyDeletehow can i activate my mcafee antivirus
Thanks for sharing such a nice piece of information with us.poster Hanging strips
ReplyDeleteblack friday computer sales
ReplyDeleteled tv walmart black friday
nectar mattress black friday
samsung led tv deals black friday
camera deal black friday
black friday computer sales
led tv walmart black friday
nectar mattress black friday
samsung led tv deals black friday
camera deal black friday
Thanks for sharing your wealthy information. This is one of the excellent posts which I have seen. I go through your all of your blog, but this blog is the best one. It is really what I wanted to see hope in future you will continue for sharing such an excellent post
ReplyDeleteDịch vụ làm visa Hàn Quốc nhanh tại Hà Nội
kinh nghiệm xin visa Nhật Bản
giá vé máy bay từ đức về việt nam
gia ve may bay tu han quoc ve viet nam
Cách đặt vé máy bay tu Nhat Ban ve Viet Nam
amazon sources
ReplyDeletesources is here
website sources
all around best sources
health sources
product saas sources
best tech sources
saas sourcesecommerce sources
best sources
ecommerce sources
This is one of the most incredible blogs Ive read in a very long time.
ReplyDeleteve may bay tu han quoc ve viet nam
bao giờ có chuyến bay từ úc về việt nam
vé máy bay từ san francisco về việt nam
Đặt vé online từ đài loan về việt nam rẻ nhất
chuyến bay thẳng từ mỹ về việt nam
cách đăng ký về việt nam từ canada
I really like the blog.I have shared your site with many friends and family. It is always a pleasure to read.
ReplyDeletethe best luxury Watches
I read your blog. It's very informative to me. Would you like to buy
ReplyDeleteMirka Abrasives | Deos
I really like the blog.I have shared your site with many friends and family. It is always a pleasure to read.
ReplyDeleteReal Relax Massage Chair
David Martin
ReplyDeleteReally enjoyed this post on how shelves can transform any space with style and functionality! The right shelves not only help in organizing but also act as a décor highlight. If you’re searching for elegant and durable shelves, Vibecrafts has a wonderful collection. Their designs strike the perfect balance between utility and aesthetics, making them a great choice for modern homes.
ReplyDeleteThis blog nicely explains how shelves bring both utility and style to any room. From displaying décor pieces to organizing essentials, shelves truly uplift interiors. If anyone is looking to buy stylish, space-saving, and affordable shelves online, I highly recommend Vibecrafts. Their collection blends modern design with durability, making them perfect for any home.
ReplyDeleteThis blog wonderfully explains how Shelvesare more than just storage – they also act as décor elements. From displaying books to showcasing décor pieces, the right shelves can transform any space. If you’re planning to buy stylish and high-quality shelves online, Vibecrafts is the best choice. Their collection blends functionality with modern design
ReplyDeleteThis blog wonderfully explains how Shelves are more than just storage solutions – they’re also décor elements that elevate interiors. From displaying books to showcasing decorative pieces, shelves add style and utility. If you’re looking to buy premium-quality and stylish shelves online, Vibecrafts is the perfect choice. Their collection blends functionality with modern design.
ReplyDeleteGreat blog on shelves! Your ideas on organizing and styling are very helpful. For modern, durable, and beautifully designed shelves, VibeCrafts offers fantastic options that enhance both storage and décor effortlessly.
ReplyDelete